
The Language of Flowers: Saying More With Every Bloom
Flowers speak a language of their own—one that's timeless, romantic, and deeply personal. Long before emojis and text messages, people used blooms to express love, sorrow, admiration, and hope. This silent, symbolic communication is known as floriography, or the Language of Flowers.

Tulip ‘Gavota’
Flowers speak a language of their own—one that's timeless, romantic, and deeply personal. Long before emojis and text messages, people used blooms to express love, sorrow, admiration, and hope. This silent, symbolic communication is known as floriography, or the Language of Flowers.
A Brief History of Floriography
The Language of Flowers blossomed during the Victorian era, when proper etiquette often made open expressions of emotion taboo. Instead, individuals would send secret messages through floral arrangements—each bloom chosen for its specific symbolism. These hidden meanings weren’t arbitrary; they were shaped by cultural myths, folklore, and even the colour of the petals.
Popular Flowers and What They Mean
Here are a few favourites and what they traditionally represent:
Roses: Universally known for love, the colour tells the deeper story. Red: Deep love and respect. White: Purity, innocence, new beginnings. Yellow: Friendship, joy, and cheer. Pink: Grace and admiration.
Tulips: A declaration of love. Red: True love. Purple: Royalty. Yellow: Cheerfulness
Lilies: Associated with beauty and renewal. White: Purity and remembrance.
Sunflowers: Loyalty, longevity, and adoration. Their sunny faces are symbols of warmth and positivity.
Peonies: Romance, good fortune, and a happy marriage. A popular wedding flower for a reason!
Lavender: Serenity and calm, but also devotion. A soothing scent and a beautiful sentiment.
How to Use Flower Meanings in Modern Arrangements
Today, floriography is less about secrecy and more about intentionality. Want to surprise your partner with a bouquet that says “I’m still madly in love with you”? Choose red tulips. Sending flowers to a friend who’s been going through a hard time? A mix of yellow roses and sunflowers could be the pick-me-up they may need.

Tulip Mania: The Flower That Once Took the World by Storm
When you think of tulips today, images of springtime gardens, elegant bouquets, and vibrant colour palettes likely come to mind. But did you know that these beloved blooms were once at the heart of one of the most famous financial bubbles in history?
Welcome to the curious tale of Tulip Mania—a 17th-century phenomenon where tulips were worth more than gold.

Double-headed tulips ~ also know as peony tulips
When you think of tulips today, images of springtime gardens, elegant bouquets, and vibrant colour palettes likely come to mind. But did you know that these beloved blooms were once at the heart of one of the most famous financial bubbles in history?
Welcome to the curious tale of Tulip Mania—a 17th-century phenomenon where tulips were worth more than gold.
A Blooming Obsession
Tulips arrived in the Netherlands in the late 1500s, imported from the Ottoman Empire. Their bold colours and striking petals quickly captured the hearts of Dutch society. But it wasn’t just their beauty that made tulips so desirable—it was their rarity. Certain varieties, especially the striped or "broken" tulips caused by a virus, were particularly prized and considered status symbols.
By the early 1600s, tulip fever had taken hold. Collectors, merchants, and everyday people began buying tulip bulbs not just for gardens, but as investments.
The Market Blooms—and Bursts
At the height of Tulip Mania in 1636-1637, tulip bulbs were changing hands for astonishing sums. Some rare bulbs sold for the equivalent of a house! But like all bubbles, this one eventually popped. In February 1637, tulip prices suddenly crashed. Within days, bulbs that once cost a fortune were nearly worthless.
Though the economic impact wasn't as widespread as legend suggests, the story of Tulip Mania remains a cautionary tale—and a fascinating chapter in the history of flowers.
Tulips Today: Still Treasured, More Affordable
Fortunately, today you don’t need to trade your house for a bouquet of tulips. These flowers are now grown widely and are available in nearly every colour imaginable. They're a staple of spring arrangements and a favourite among florists and flower lovers alike.
Whether you’re gifting a bunch to brighten someone's day or planting bulbs for the next season, tulips continue to symbolise love, renewal, and beauty—with a side of unforgettable history.

The History of the Bridal Bouquet
When a bride walks down the aisle, all eyes are on her—her dress, her smile, and of course, the bouquet in her hands. But have you ever wondered where this beautiful tradition began? The bridal bouquet is more than just a pretty accessory; it has a long and fascinating history that spans centuries and cultures.

Bride with her beautiful bridal bouquet
When a bride walks down the aisle, all eyes are on her—her dress, her smile, and of course, the bouquet in her hands. But have you ever wondered where this beautiful tradition began? The bridal bouquet is more than just a pretty accessory; it has a long and fascinating history that spans centuries and cultures.
Ancient Beginnings
The earliest versions of bridal bouquets weren’t made of flowers at all. In ancient Greece and Rome, brides carried bunches of herbs and spices—think garlic, dill, and rosemary—to ward off evil spirits and bring fertility and good fortune. These fragrant bundles were more about protection and symbolism than decoration.
The Middle Ages: Fragrance and Folklore
During medieval times, personal hygiene was a little... less frequent. Brides would carry strong-smelling herbs and flowers like lavender and sage to mask any unpleasant odors. It was also believed that certain flowers could protect the bride from bad luck and ill-willed spirits.
The Victorian Influence
The bridal bouquet as we know it really blossomed in the Victorian era. This was the age of "floriography"—the language of flowers. Every bloom had a meaning: orange blossoms for purity, ivy for fidelity, and roses for love. Queen Victoria herself carried a bouquet of snowdrops at her wedding to Prince Albert, sparking a trend that quickly caught on.
Modern Bouquets: A Personal Statement
Today, bridal bouquets are as unique as the bride herself. Some choose flowers that match their wedding colours, others pick blooms that hold personal meaning—perhaps the same flower their grandmother carried, or a favourite from their childhood garden.
Sustainability and seasonality are also becoming more important. Many brides now opt for locally grown, in-season flowers or even dried arrangements for a modern twist on an age-old tradition.
A Tradition That Keeps Growing
From protective herbs to personalized masterpieces, the bridal bouquet has come a long way. It remains a beautiful symbol of love, tradition, and self-expression. And as florists, we feel honoured every time we get to be a part of that story—helping each bride carry something meaningful down the aisle.

Bridal bouquet

A History of Wedding Flower Buttonholes
At the heart of every wedding, flowers tell a story—of love, beauty, and timeless tradition. Among these floral elements, the humble buttonhole (or boutonnière) has a history as rich and romantic as the ceremonies themselves. But where did this charming custom begin, and how has it blossomed into a must-have detail for grooms and groomsmen today?

Buttonholes ready to be given to the bridal party
A History of Wedding Flower Buttonholes
At the heart of every wedding, flowers tell a story—of love, beauty, and timeless tradition. Among these floral elements, the humble buttonhole (or boutonnière) has a history as rich and romantic as the ceremonies themselves. But where did this charming custom begin, and how has it blossomed into a must-have detail for grooms and groomsmen today?
Ancient Roots of Floral Symbolism
The tradition of wearing flowers dates back thousands of years. In Ancient Greece, men would adorn their lapels with small blooms and herbs, believed to ward off evil spirits and bad luck—particularly important on one's wedding day. Similarly, during the Middle Ages, knights would wear their lady's colours or a flower from her bouquet as a token of love and fidelity when heading into battle.
From Armor to Aisles: The Buttonhole Evolves
By the 18th and 19th centuries in Europe, especially in Victorian England, buttonholes became a refined fashion statement for gentlemen. Flowers in a man’s lapel not only signified elegance and status but also carried sentimental value, especially during courtship and weddings. The name "buttonhole" itself comes from the practice of placing a small flower into the buttonhole of a suit or coat.
The Language of Flowers
The Victorians also popularised the idea of floriography—the language of flowers—where each bloom carried its own meaning. A red rose spoke of true love, a lily of purity, and a sprig of rosemary of remembrance. Grooms began to select buttonhole flowers not only for their aesthetic appeal but for their symbolism, personalising their attire with a deeper message.
Modern -Day Meaning and Style
Today, wedding buttonholes remain a staple in bridal party attire, worn by grooms, groomsmen, fathers, and even ring bearers. While traditional blooms like roses, carnations, and lilies are still popular, modern floristry has opened the door to creative combinations—featuring succulents, wildflowers, herbs, and even feathers. Each design tells a story unique to the couple, blending tradition with contemporary flair.
Why the Buttonhole Still Matters
Though small in size, the buttonhole plays a big role in tying a wedding's floral theme together. It connects the groom to the bridal bouquet, complements the colour palette, and adds a personal, polished touch to formalwear. It's a nod to heritage, a symbol of love, and a beautiful detail that brings charm and character to the day.
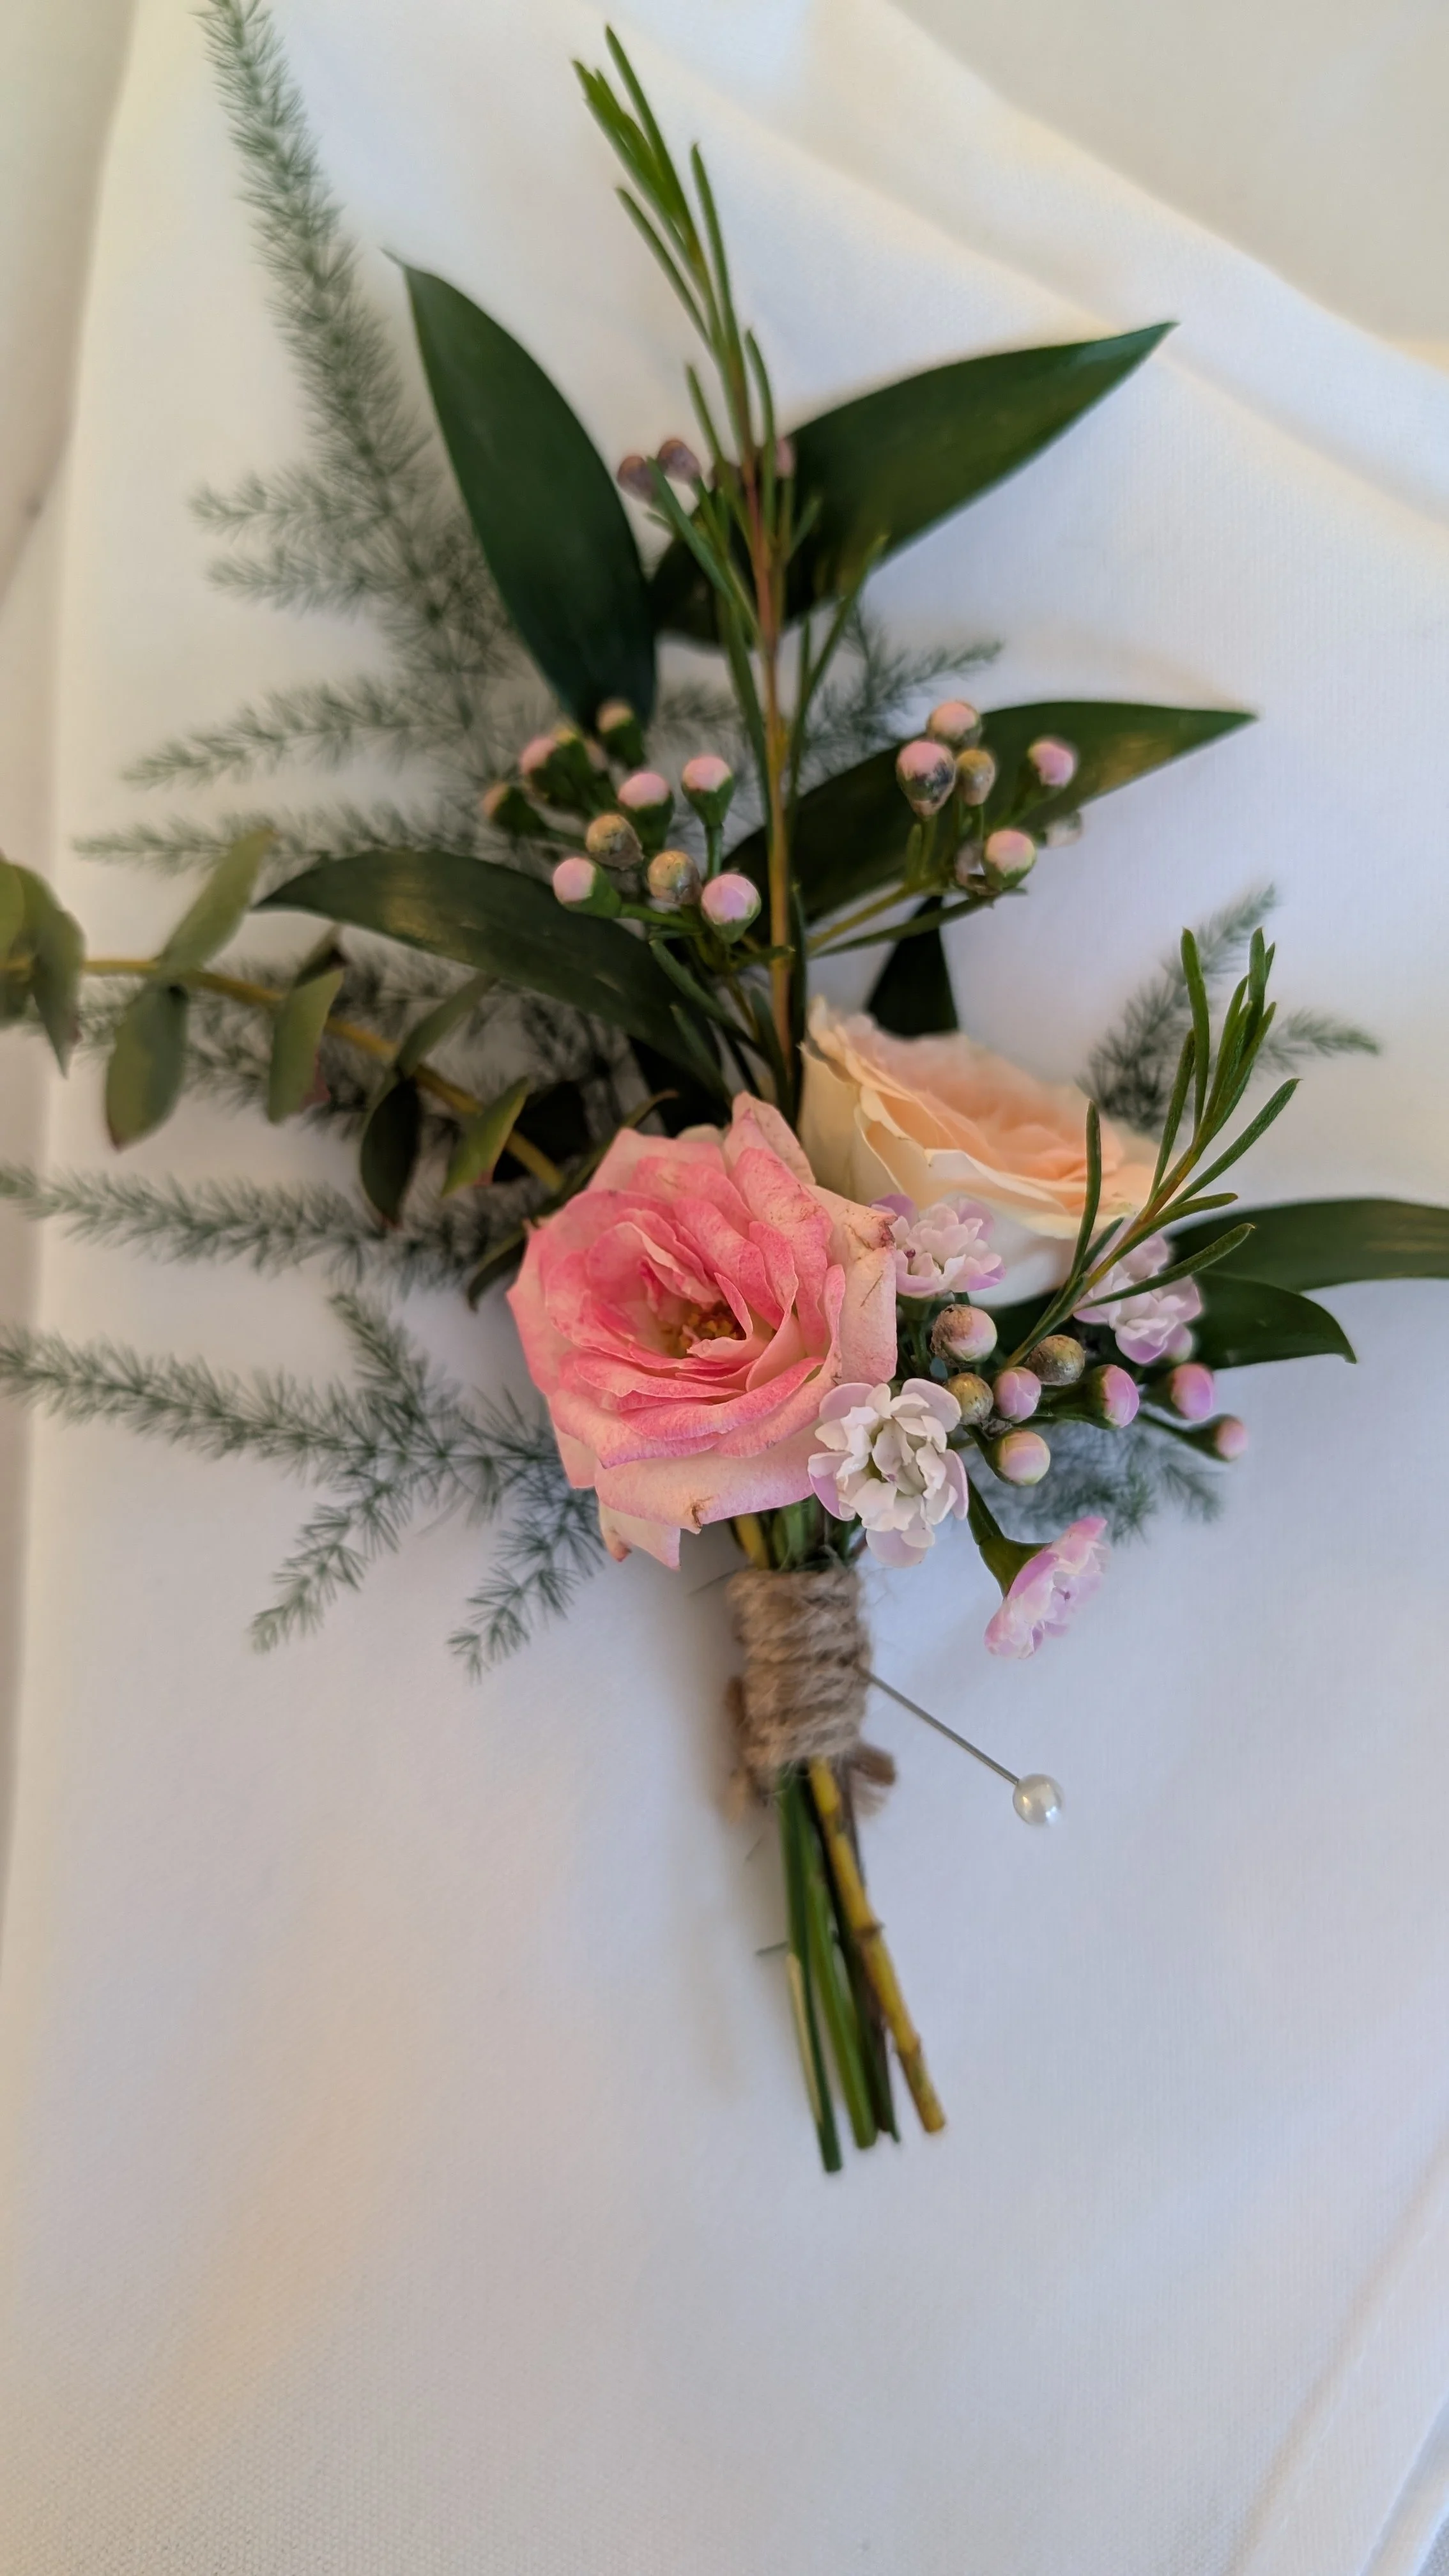
Buttonhole ~ spray roses, wax flower, asparagus fern, ruscus and eucalyptus

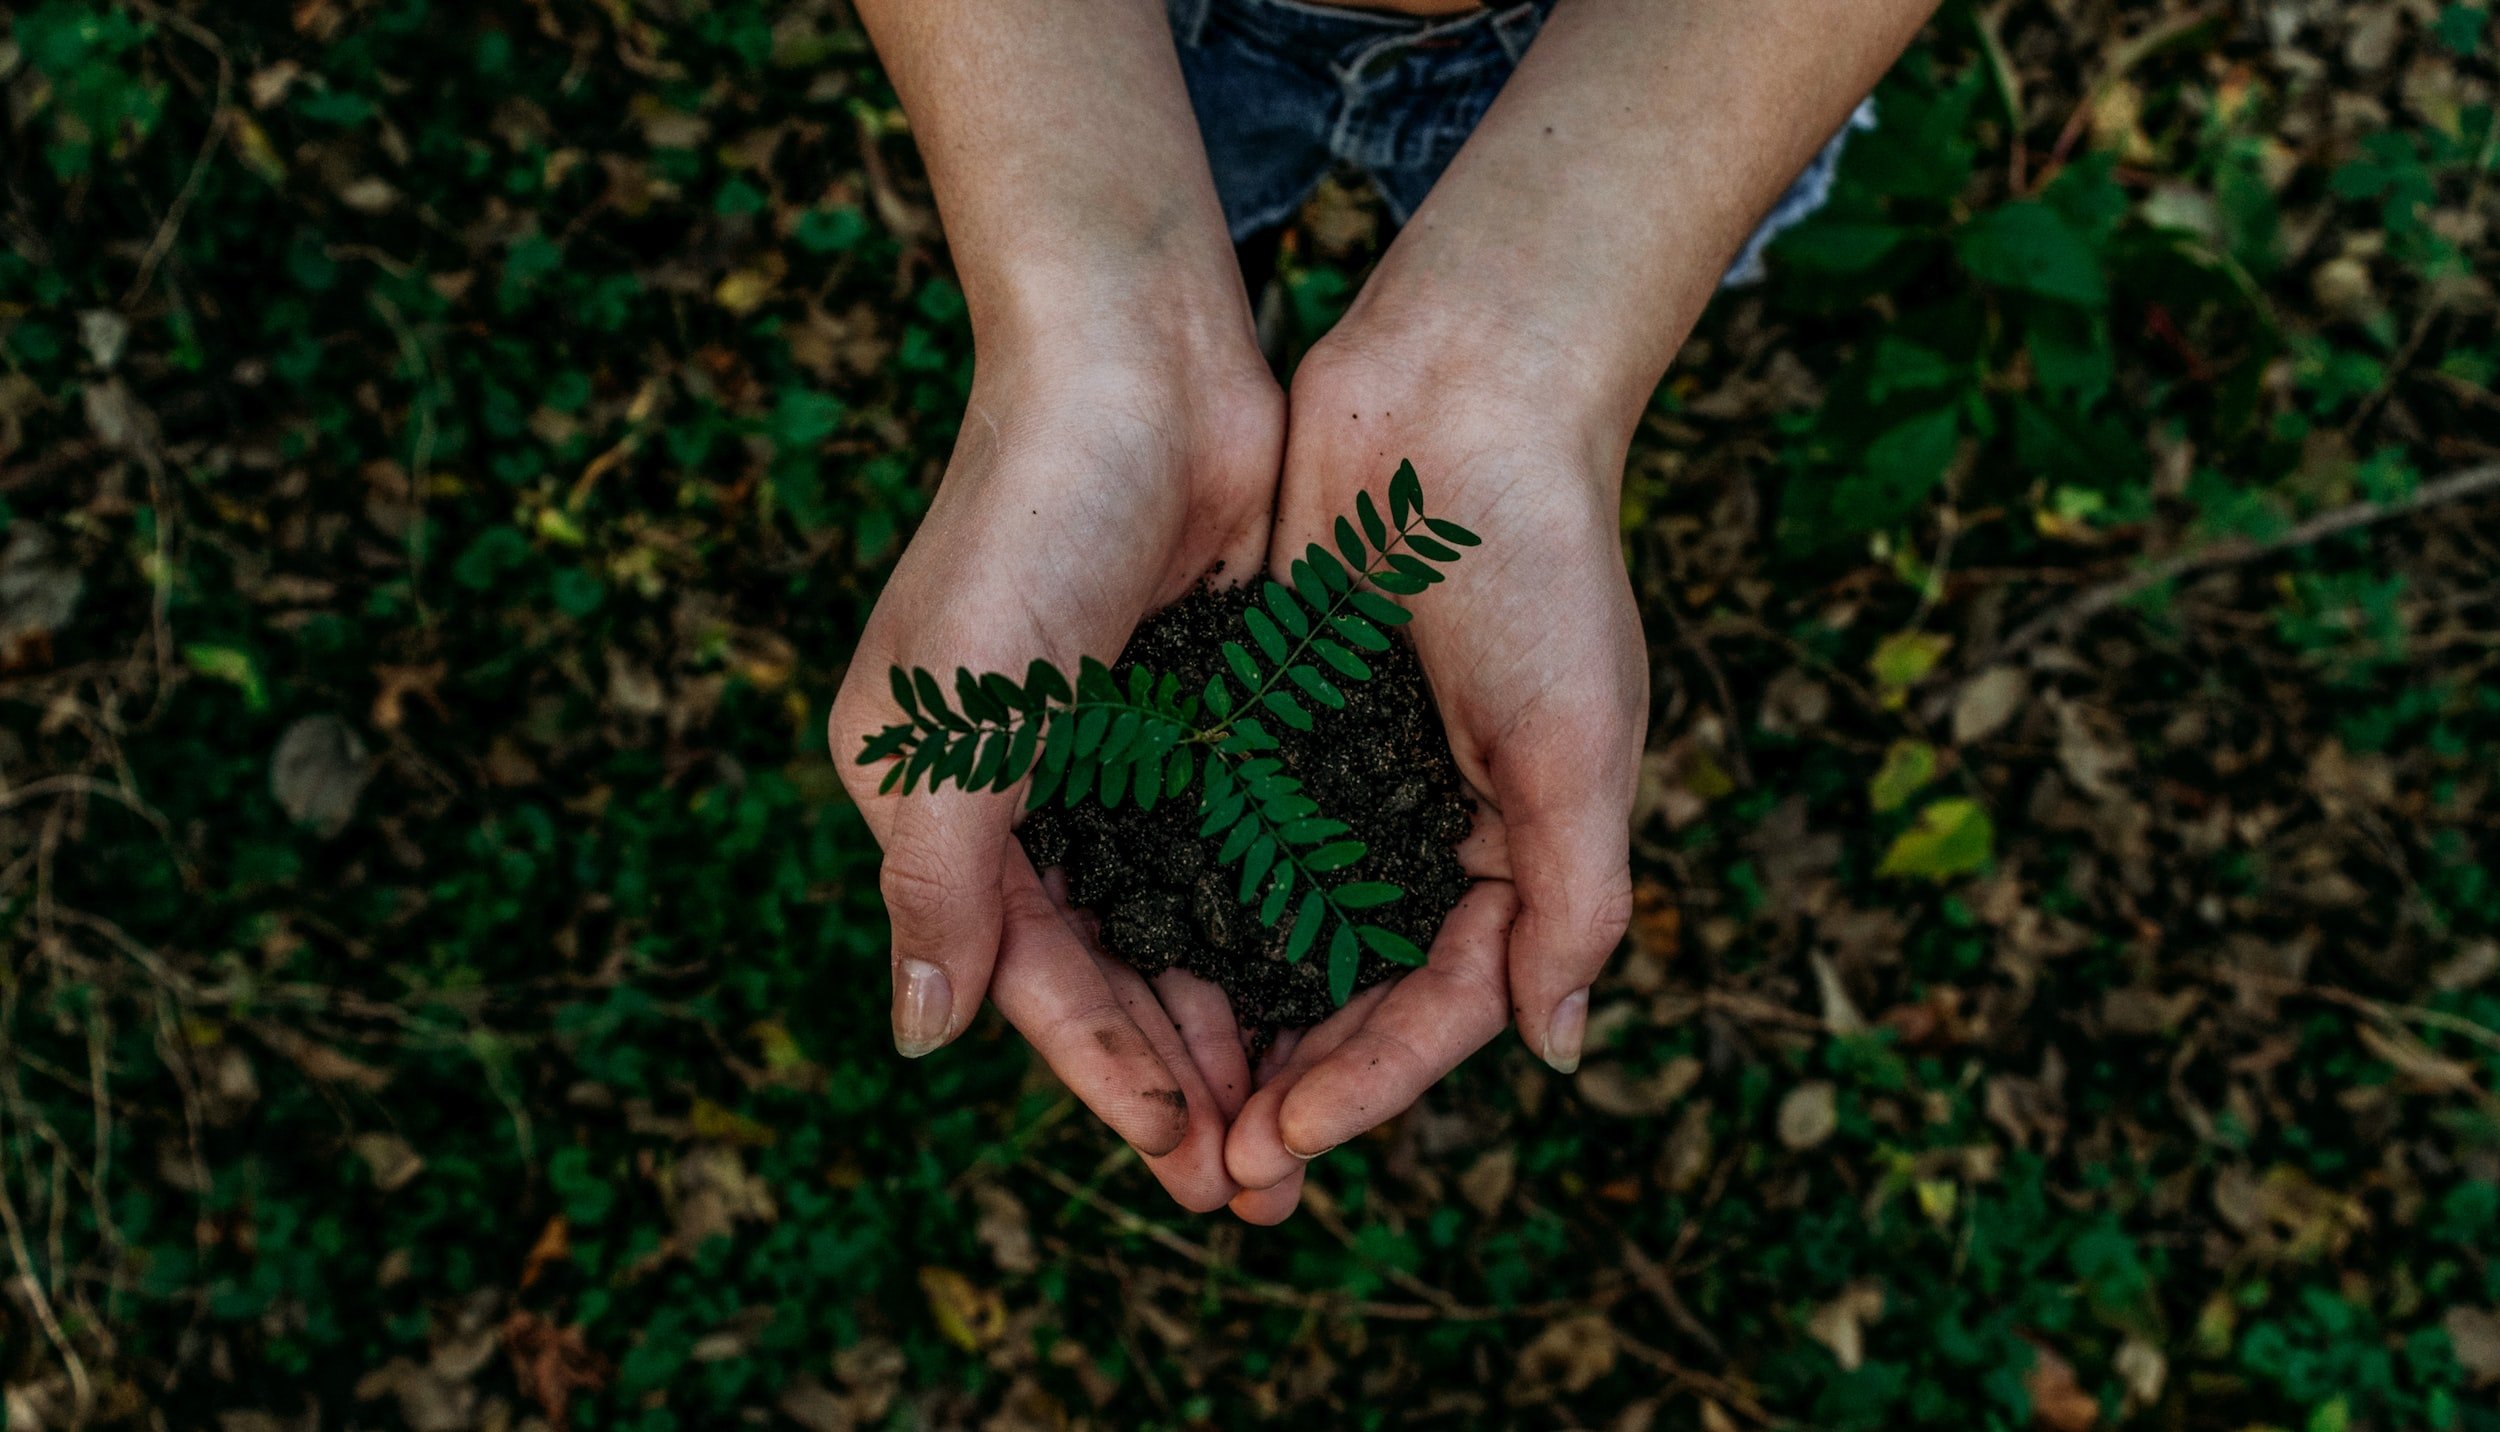
Sustainable Wedding Flowers: The Best Choice For You And The Planet
When it comes to planning a wedding, flowers play a crucial role in setting the tone and creating a beautiful atmosphere. From the bridal bouquet to centrepieces and boutonnieres, flowers add elegance and charm to the entire event. If you are a bride and groom who dream of beautiful sustainable flowers inspired by nature this post is essential reading.

Bride and groom on their wedding day
When it comes to planning a wedding, flowers play a crucial role in setting the tone and creating a beautiful atmosphere. From the bridal bouquet to centrepieces and boutonnieres, flowers add elegance and charm to the entire event. If you are a bride and groom who dream of beautiful sustainable flowers inspired by nature this post is essential reading.
Did You Know That Floral Foam Takes Hundreds of Years to Decompose?
Floral foam, used by many florists to arrange flowers, is made from plastic-based phenolic foam. It contains toxic chemicals. And it takes hundreds of years to break down in landfills. When floral foam becomes wet, it breaks down into small particles that can enter the water systems. These microplastics are harmful to wildlife as well as humans.
Imported Flowers: Not So Rosy
90% of flowers are imported to the UK each year - think about the impact of this on the planet. The biggest environmental impact comes from carbon emissions. Flying flowers from Kenya to the UK creates a substantial amount of CO2 emissions. Once in the UK, imported flowers are stored in refrigerators. This consumes additional energy.
How Can Something So Beautiful Be Harmful to Our Health?
Stems, leaves and unsold flowers generates substantial waste. Flower waste, if not composted, often ends up in landfills. This contributes to greenhouse gas emissions, damaging soil health and biodiversity. Also, flower waste decomposes slowly producing methane.
Imported flowers are often treated with pesticides and other chemicals. When flower waste isn’t properly composted, these chemicals can seep into our soil and water systems. This can potentially harm the ecosystems and our health.
Discover the Benefits of Sustainable Wedding Flowers
At Floral Edit, we are committed to sustainable floristry. Nature inspires our designs. We aim to:
§ Use seasonal British flowers and plants for our designs (when possible)
This helps us to create floral arrangements that are more in tune with the natural world. By aiming to source seasonal British flowers as much as possible, we do our bit to reduce carbon emissions and support local farmers and other small business. British seasonal flowers smell beautiful, stay fresh for longer and look right for the time of year.
§ Never use floral foam
This helps to reduce plastic pollution. We use alternatives to floral foam like reusable flower frogs and chicken wire or natural materials. Our arrangements look more natural and organic as a result.
§ Avoid single-use plastics
This helps to reduce pollution, waste and minimises the risk of microplastics entering the food chain.
§ Compost all flower waste
This helps to promote biodiversity and reduce greenhouse gas emissions.
Sustainable wedding flowers are a responsible choice. Choosing Floral Edit to create your wedding flowers means you will benefit from beautiful natural wedding arrangements that are inspired by nature and kind to nature.
We look forward to making your special day even more beautiful.


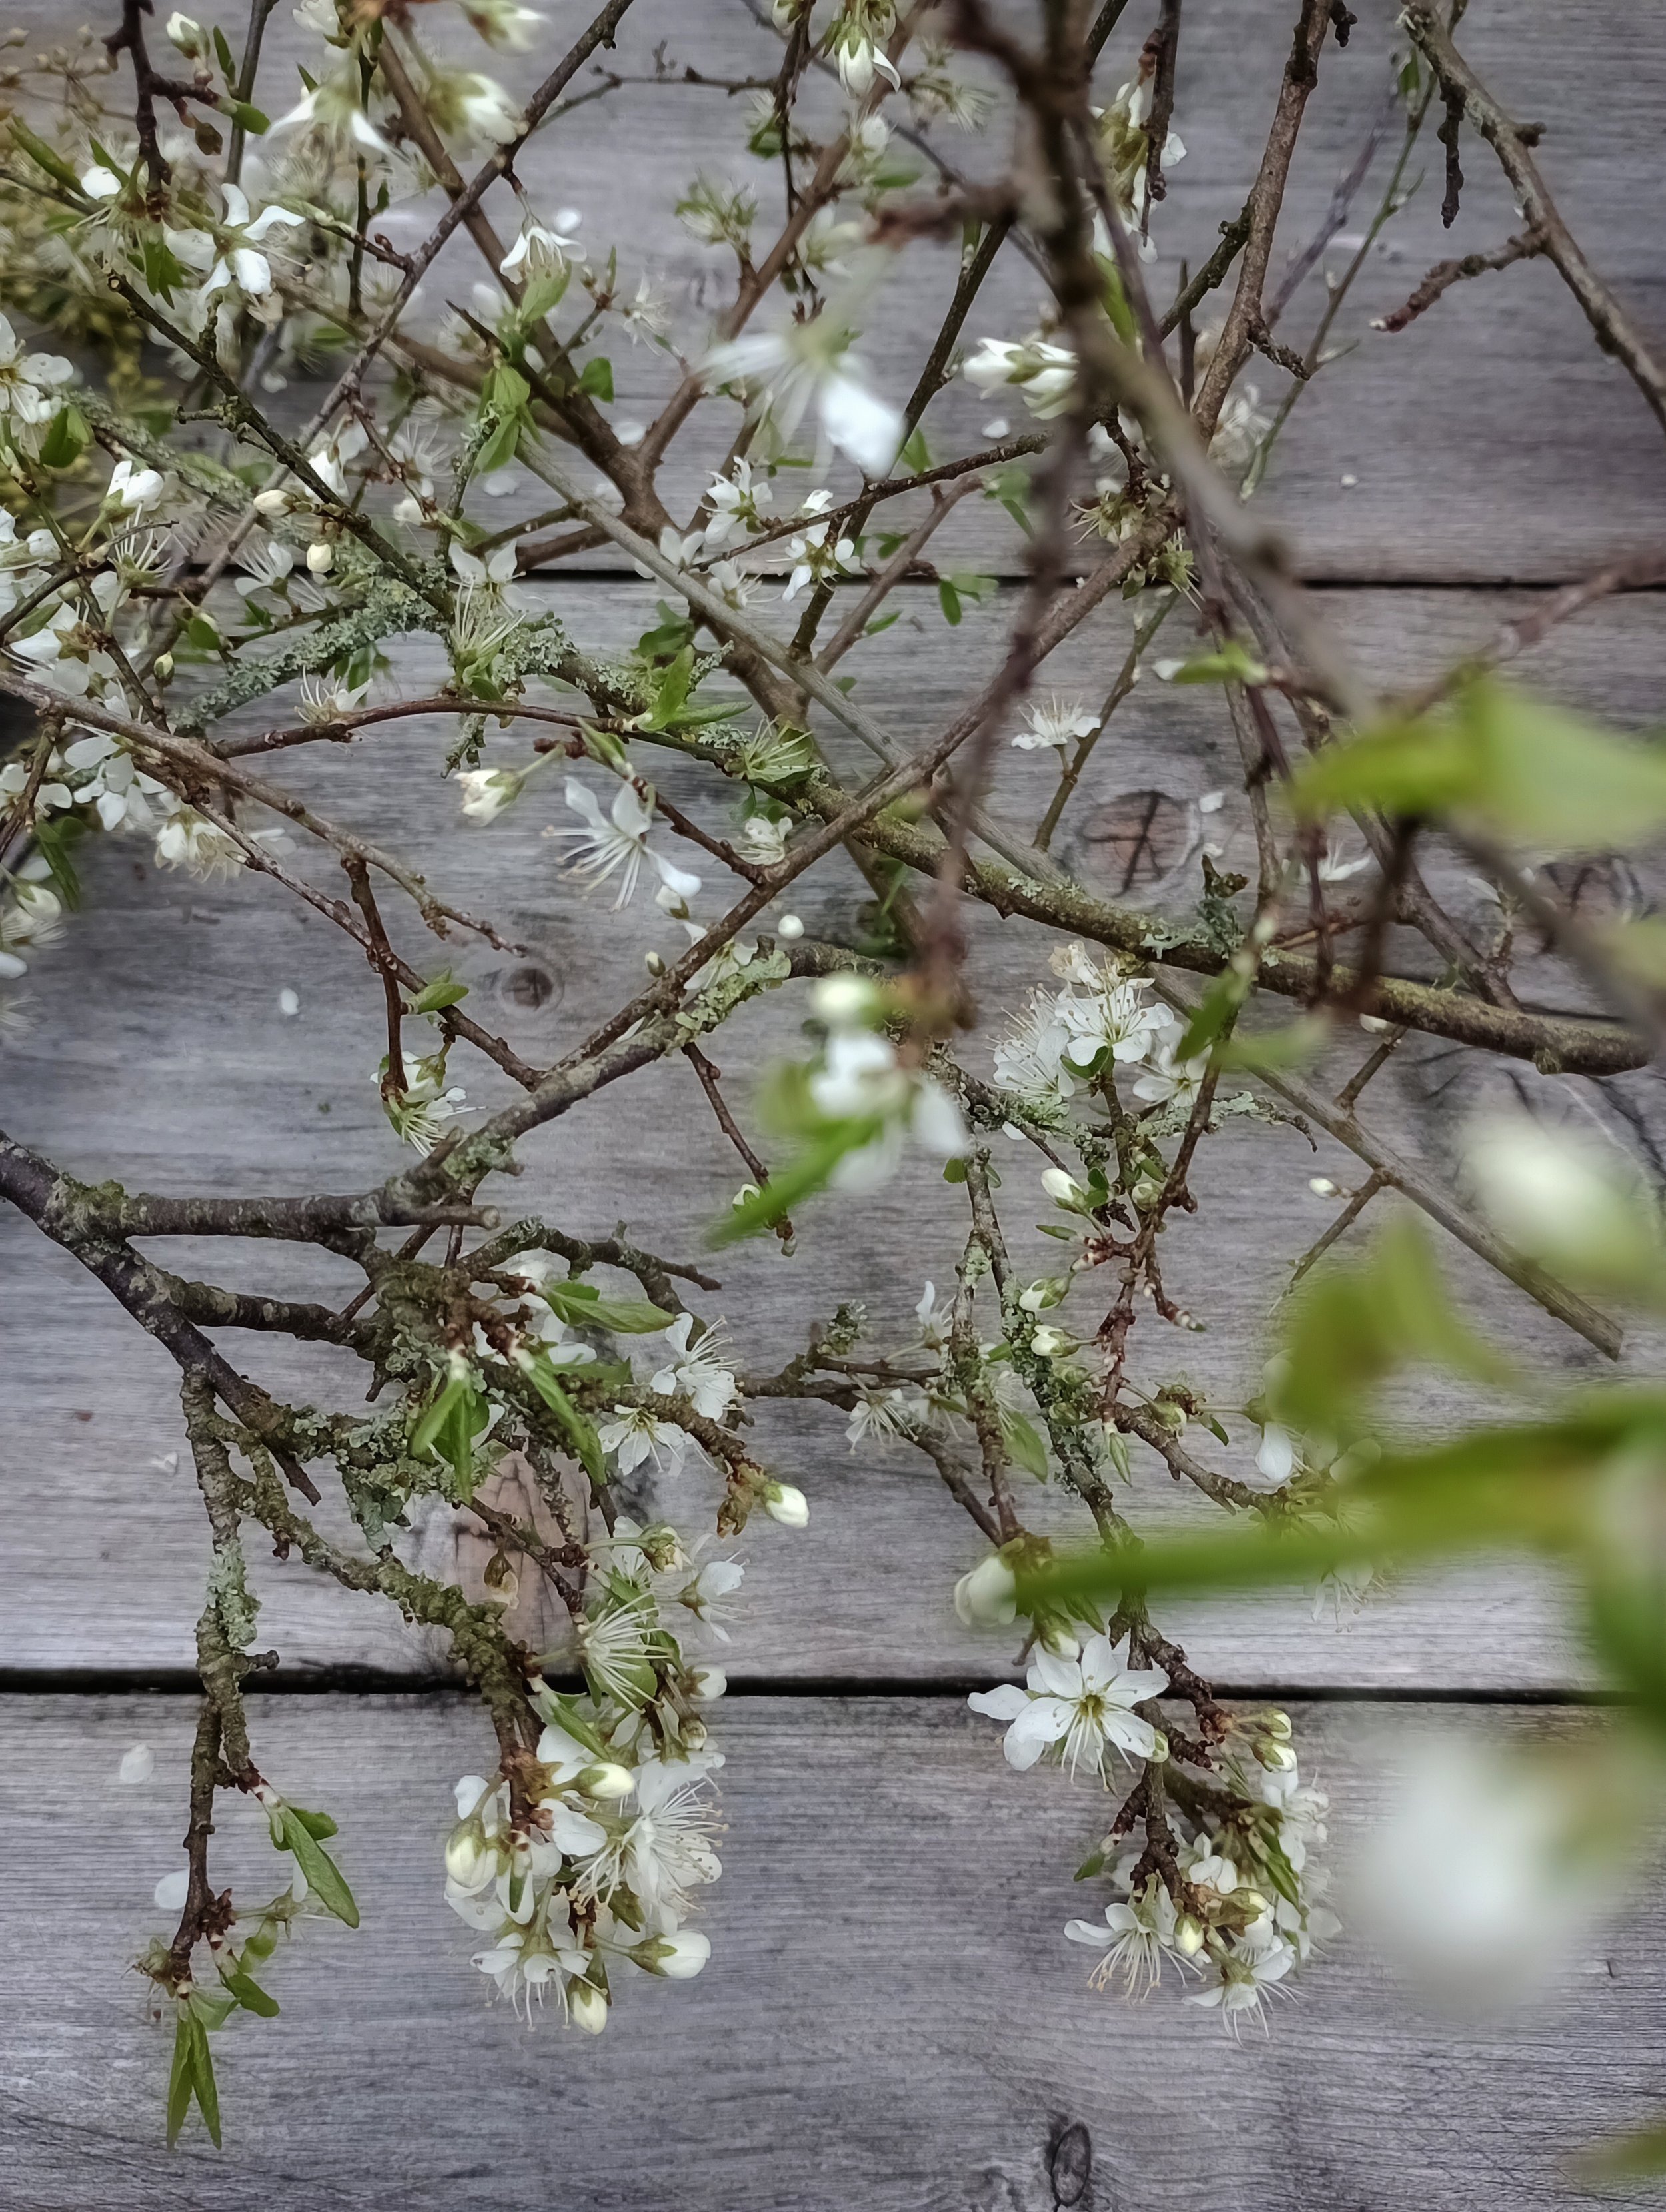
Capturing Nature's Beauty: Lessons from a Flower Photography Course
I wanted to enhance and improve my flower photography skills to capture the delicate elegance of flowers and landscapes through the lens of my camera phone. I have never been one for using cameras (I can’t seem to get my head around all the settings!). Enrolling in a flower photography course not only enhanced my technical skills but also provided valuable insights into the artistry behind every click.

I wanted to enhance and improve my flower photography skills to capture the delicate elegance of flowers and landscapes through the lens of my camera phone. I have never been one for using cameras (I can’t seem to get my head around all the settings!). Enrolling in a flower photography course not only enhanced my technical skills but also provided valuable insights into the artistry behind every click.
Here’s what I learned…….
The Rule of Thirds:
The rule of thirds serves as a fundamental principle in composing visually appealing images. Placing the main subject or focal point off-center, intersecting with imaginary lines dividing the frame into thirds, creates a balanced and dynamic composition. This technique adds depth and interest to floral photographs, guiding the viewer's gaze with precision.
The Rule of Odds:
The rule of odds involves incorporating an odd number of subjects within the frame, rather than an even number. This technique enhances visual harmony and creates a sense of natural asymmetry, making the composition more engaging and aesthetically pleasing.
Fill the Frame:
To capture the intricate details and textures of flowers, filling the frame with the subject is paramount. By eliminating distractions and focusing solely on the flower, the viewer is immersed in its captivating allure. This technique emphasises intimacy and invites closer inspection, allowing the viewer to appreciate the subtle nuances and inherent beauty of each petal and stamen.


Negative Space:
Incorporating negative space around the main subject provides breathing room within the composition, drawing attention to the focal point while enhancing its significance.


Leading Lines:
The use of leading lines directs the viewer's gaze towards the focal point, guiding them through the photograph with fluidity and purpose. Incorporating natural lines within the composition adds movement and dimension, transforming a static image into a captivating visual narrative.

Focal Point:
Identifying a clear focal point within the frame anchors the viewer's attention and provides a focal point for the composition. Whether it's a vibrant bloom, a dew-kissed bud, or a delicate insect perched upon a petal, the focal point invites the viewer to explore and appreciate its beauty.


I have always thought that taking pictures in bright sunlight is best. However, this is not the case. I learned that the best time to photograph gardens and flowers is when there is fog, mist, dew, frost and at sunset and sunrise.
Other top tips include:
Edge patrol - checking for mess and clutter before taking a photograph.
Taking a photograph from a different angle, not just from the human view.
Creating layers.
Using a light box.


The course was held at Holehird Gardens in Windemere. A beautiful setting. Well worth a visit if you are in The Lakes. Newton Rigg Training delivered the course. It was excellent value for money. I was inspired to ensure that each photograph tells a story, inviting viewers to pause, reflect and enjoy the wonders of nature!


The Complete Guide to Wedding Flowers: Costs, Types, and Preparation
When it comes to planning a wedding, flowers play a pivotal role in setting the tone and creating a beautiful ambiance. From the bridal bouquet to centrepieces and boutonnieres, flowers add elegance and charm to the entire event. However, understanding the costs, types, and preparation involved in wedding flowers can be overwhelming. That's why I have put together this comprehensive guide to help you navigate the world of wedding blooms.

When it comes to planning a wedding, flowers play a pivotal role in setting the tone and creating a beautiful ambiance. From the bridal bouquet to centrepieces and boutonnieres, flowers add elegance and charm to the entire event. However, understanding the costs, types, and preparation involved in wedding flowers can be overwhelming. That's why I have put together this comprehensive guide to help you navigate the world of wedding blooms.
Understanding the Costs:
The cost of wedding flowers can vary significantly depending on factors such as the type of flowers chosen, the season, the size of the arrangements, and the florist's expertise. On average, couples can expect to allocate around 8-10% of their total wedding budget to flowers. However, this percentage can fluctuate based on individual preferences and priorities.
Some key factors that influence the cost of wedding flowers include:
1. Type of Flowers: Certain flowers, such as peonies and orchids, are more expensive than others due to their rarity or seasonal availability.
2. Size and Complexity of Arrangements: Larger and more elaborate arrangements, such as cascading bouquets or floral arches, require more blooms and labour, thus increasing the overall cost.
3. Labour and Design Fees: Florists typically charge a fee for their design expertise and labour involved in creating and arranging the flowers.
4. Seasonality: Flowers that are out of season or need to be imported may incur higher costs due to shipping and sourcing expenses.
It's essential to communicate your budget and preferences clearly with your florist to ensure they can create arrangements that meet your expectations while staying within your budget.
Types of Wedding Flowers:
When it comes to choosing wedding flowers, the options are endless. From classic roses to exotic blooms, here are some popular types of wedding flowers to consider:
1. Roses: Symbolizing love and romance, roses are a timeless choice for weddings and are available in a variety of colours and sizes.

2. Peonies: Known for their lush, ruffled petals and intoxicating fragrance, peonies are a favourite among brides for their romantic appeal.

3. Hydrangeas: With their voluminous blooms and soft, pastel hues, hydrangeas add a touch of elegance and charm to any arrangement.

4. Lilies: Whether it's the classic white lily or the vibrant stargazer lily, these flowers exude beauty and sophistication, making them a popular choice for weddings.

5. Tulips: Available in a rainbow of colours, tulips symbolize perfect love and are a versatile option for bouquets and centrepieces.

Preparing Wedding Flowers:
Creating stunning wedding flower arrangements requires careful planning and attention to detail. Here's what goes into making and preparing wedding flowers:
1. Consultation: Start by scheduling a consultation with your florist to discuss your vision, theme, colour scheme, and budget. Be sure to bring inspiration photos and any specific ideas you have in mind.
2. Flower Selection: Work with your florist to select the perfect flowers for your wedding day based on your preferences, seasonality, and budget.
3. Design and Proposal: Your florist will create a detailed proposal outlining the types of arrangements, quantities, and pricing. Review the proposal carefully and make any necessary adjustments before finalizing the order.
4. Preparation and Processing: Once the flowers are sourced, they need to be properly processed and prepared to ensure they stay fresh and vibrant. This includes trimming stems, removing foliage, and hydrating the blooms.
5. Assembly and Arrangement: On the day of the wedding, your florist will assemble and arrange the flowers according to your specifications, taking care to deliver them to the venue on time and in pristine condition.
By understanding the costs, types, and preparation involved in wedding flowers, you can ensure that your floral arrangements are not only stunning but also seamlessly integrated into your special day. With careful planning and the expertise of a skilled florist, your wedding flowers will create lasting memories for you and your guests to cherish.
To book a wedding flowers consultation, please feel free to contact me via email at info@floraleditflowers.co.uk. I look forward to discussing your floral needs and helping to make your special day even more beautiful.

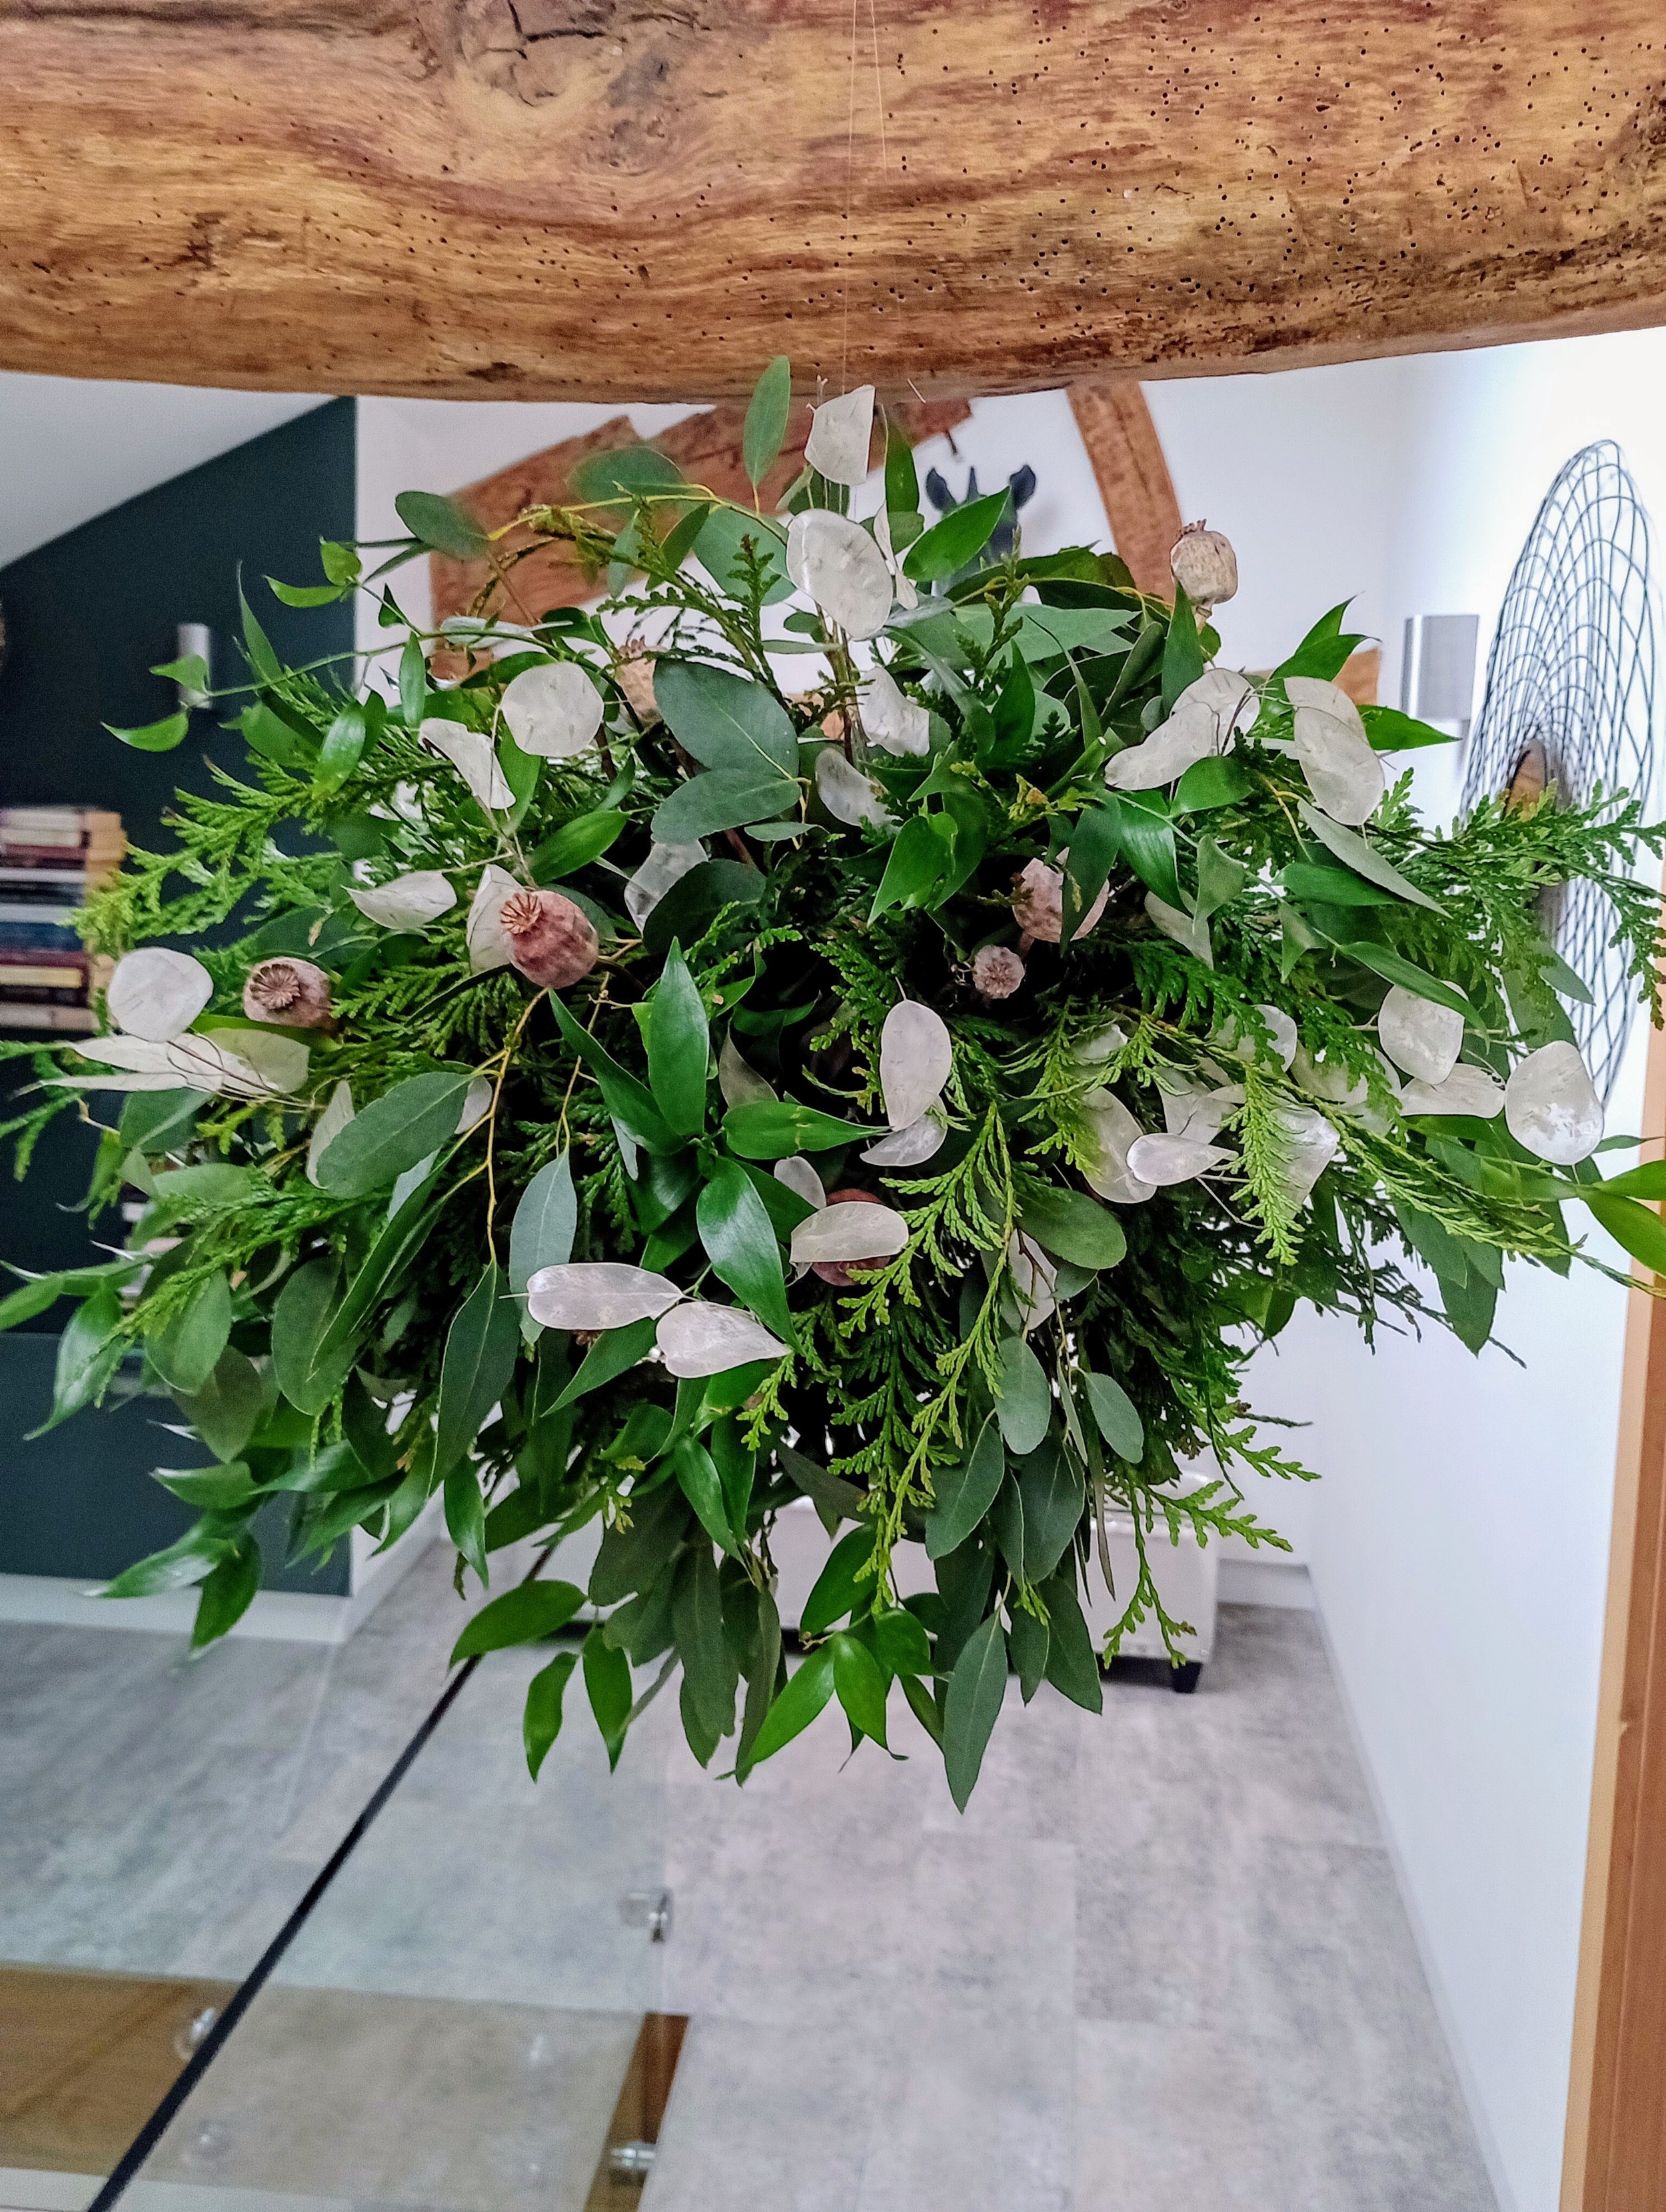
A Floating Foliage Cloud
In this journal I will take you step-by-step through the process of creating your own floating flower cloud using simple materials like chicken wire, fishing wire, and repurposed Christmas foliage.

In this journal I will take you step-by-step through the process of creating your own floating flower cloud using simple materials like chicken wire, fishing wire, and repurposed Christmas foliage.
You will need:
Chicken Wire:
Choose a sturdy piece of chicken wire to form the base of your floating cloud. This will provide the structure for attaching the foliage.
Fishing Wire:
Opt for transparent fishing wire to give the illusion that your foliage is magically suspended in the air. This will be used to hang the cloud.
Christmas Foliage:
Repurpose your leftover Christmas table centrepiece or wreath foliage. Use a variety of greens to add depth and texture to your floating cloud.

Ribbon:
Select festive silver and red ribbon to create beautiful bows that will be attached to the foliage, adding a pop of colour.
Step-by-Step Guide:
Step 1: Shape the Chicken Wire
Create a circular or cloud-like shape with the chicken wire, ensuring it's secure and has enough space to hold the foliage. This will be the foundation for your floating cloud. You can add moss to the chicken wire to provide some moisture for the foliage. I have not in this case as the foliage is hardy and will last a few days out of water. Attach the fishing wire to a section of the chicken wire and suspend.

Step 2: Add the Foliage
Add the foliage to the chicken wire. As you add more foliage the structure will become more secure. I always add one type of foliage at a time.


Step 3: Add Ribbon Bows
Tie elegant bows using the silver and red ribbon. Attach them strategically to the foliage, spacing them evenly to enhance the overall visual appeal.

Tips and Tricks:
Balance is Key:
Ensure an even distribution of foliage and ribbon to maintain balance and symmetry in your floating cloud.
Experiment with Heights:
Vary the length of the fishing wire to create a dynamic and eye-catching display.
Personalise with Ornaments:
Add small ornaments or twinkling fairy lights for an extra touch of magic.


Candle Magic: Upcycling with Soya Wax and Vintage Glass Treasures
This year, I wanted to create my own candles for the Christmas table using charity shop finds. It is the first time I have made candles and I found the process relatively straight forward. I bought a candle making kit online and followed the safety instructions carefully.

This year, I wanted to create my own candles for the Christmas table using charity shop finds. It is the first time I have made candles and I found the process relatively straight forward. I bought a candle making kit online and followed the safety instructions carefully.
You will need:
A candle making kit (I chose one with soya wax)
Vintage finds
Ceramic tray
Chicken Wire
Foliage
Step 1: Soya Wax
Soya wax, derived from soybeans, is a renewable resource known for its clean and slow burn. By selecting high-quality soya wax you will ensure a sustainable foundation for your creations. Its natural properties provide a longer-lasting, environmentally friendly alternative to traditional paraffin wax.

Soya Wax from the candle making kit
Step 2: Vintage Hunt - Charms in Charity Shops
Embark on a treasure hunt at your nearby charity shops to discover hidden gems in the form of vintage glassware. Old teacups, elegant goblets, or ornate jars can serve as vessels for your candles. Not only does this add a touch of character to your creations, but it also contributes to the repurposing of pre-loved items.

Charity shop finds
Step 3: Crafting Your Candle
Melt the soya wax and carefully pour it into your chosen vintage glass container. Take your time with this step to avoid air bubbles and ensure an even surface. Add fragrance oils if desired.

The instructions in the kit tell you how much wax to use

Candle wicks, candle wick stickers and candle wick holder
Step 4: Curing Time
Allow your candles to cure and cool completely before lighting them.
Step 5: Styling your table
I decided to use a white ceramic tray with chicken wire to create a foliage centrepiece for the table. I used spruce, ruscus, eucalyptus and conifer. This is easy to make without the need for floral foam. I also inserted two long white candles (these were not homemade!). The candles were held in place by the chicken wire. Most of the foliage was from the garden.


A Plumbers' Pipe Conifer Wreath with Hessian Bow!
When it comes to Christmas decorations, the traditional wreath holds a special place in our hearts. This year, why not add a unique twist to your decor with a wreath made from plumber's piping? This unconventional material can be transformed into a stunning and sizable wreath ring. In this journal post, I will take you through the steps of creating a large conifer wreath with a finishing touch of rustic Hessian bow.

When it comes to Christmas decorations, the traditional wreath holds a special place in our hearts. This year, why not add a unique twist to your decor with a wreath made from plumber's piping? This unconventional material can be transformed into a stunning and sizable wreath ring. In this journal post, I will take you through the steps of creating a large conifer wreath with a finishing touch of rustic Hessian bow.
You will need:
Plumbers' piping (choose a size that suits your desired wreath dimensions)
Conifer branches
Secateurs
Hessian ribbon
Scissors
Strong tape
Reel wire
Step 1: Create the Wreath Ring
Measure and cut the plumbers' piping to your preferred size, ensuring it forms a complete ring. You can find plumbers' piping at your local hardware store, and they often cut it to custom lengths. I used piping that was left over from a plumbing job.
Secure the ends of the piping together using strong tape, making sure it forms a sturdy circle. This will be the base of your wreath. The wreath ring in the image below is approx. 26 inches.

Step 2: Attach the Conifer Branches
Trim your conifer branches into manageable lengths, around 6-8 inches. The exact length will depend on the size of your wreath and personal preference.
Using floristry reel wire attach the conifer branches to the plumbers' piping, ensuring they overlap slightly to create a lush and full appearance. Continue this process until the entire wreath ring is covered with conifer branches.


Step 3: Add the Hessian Bow
Cut a length of Hessian ribbon, leaving enough for both the bow and tails. The size of the bow can be adjusted based on your preference. Form a bow with the Hessian ribbon and secure it in the centre with a small piece of wire and attach the wire to the wreath to secure the bow.

Step 4: Hang and Admire
Find the perfect spot on your door or wall to showcase your wreath.

Once the foliage has died, you can reuse the wreath ring time and time again.
Happy Christmas!

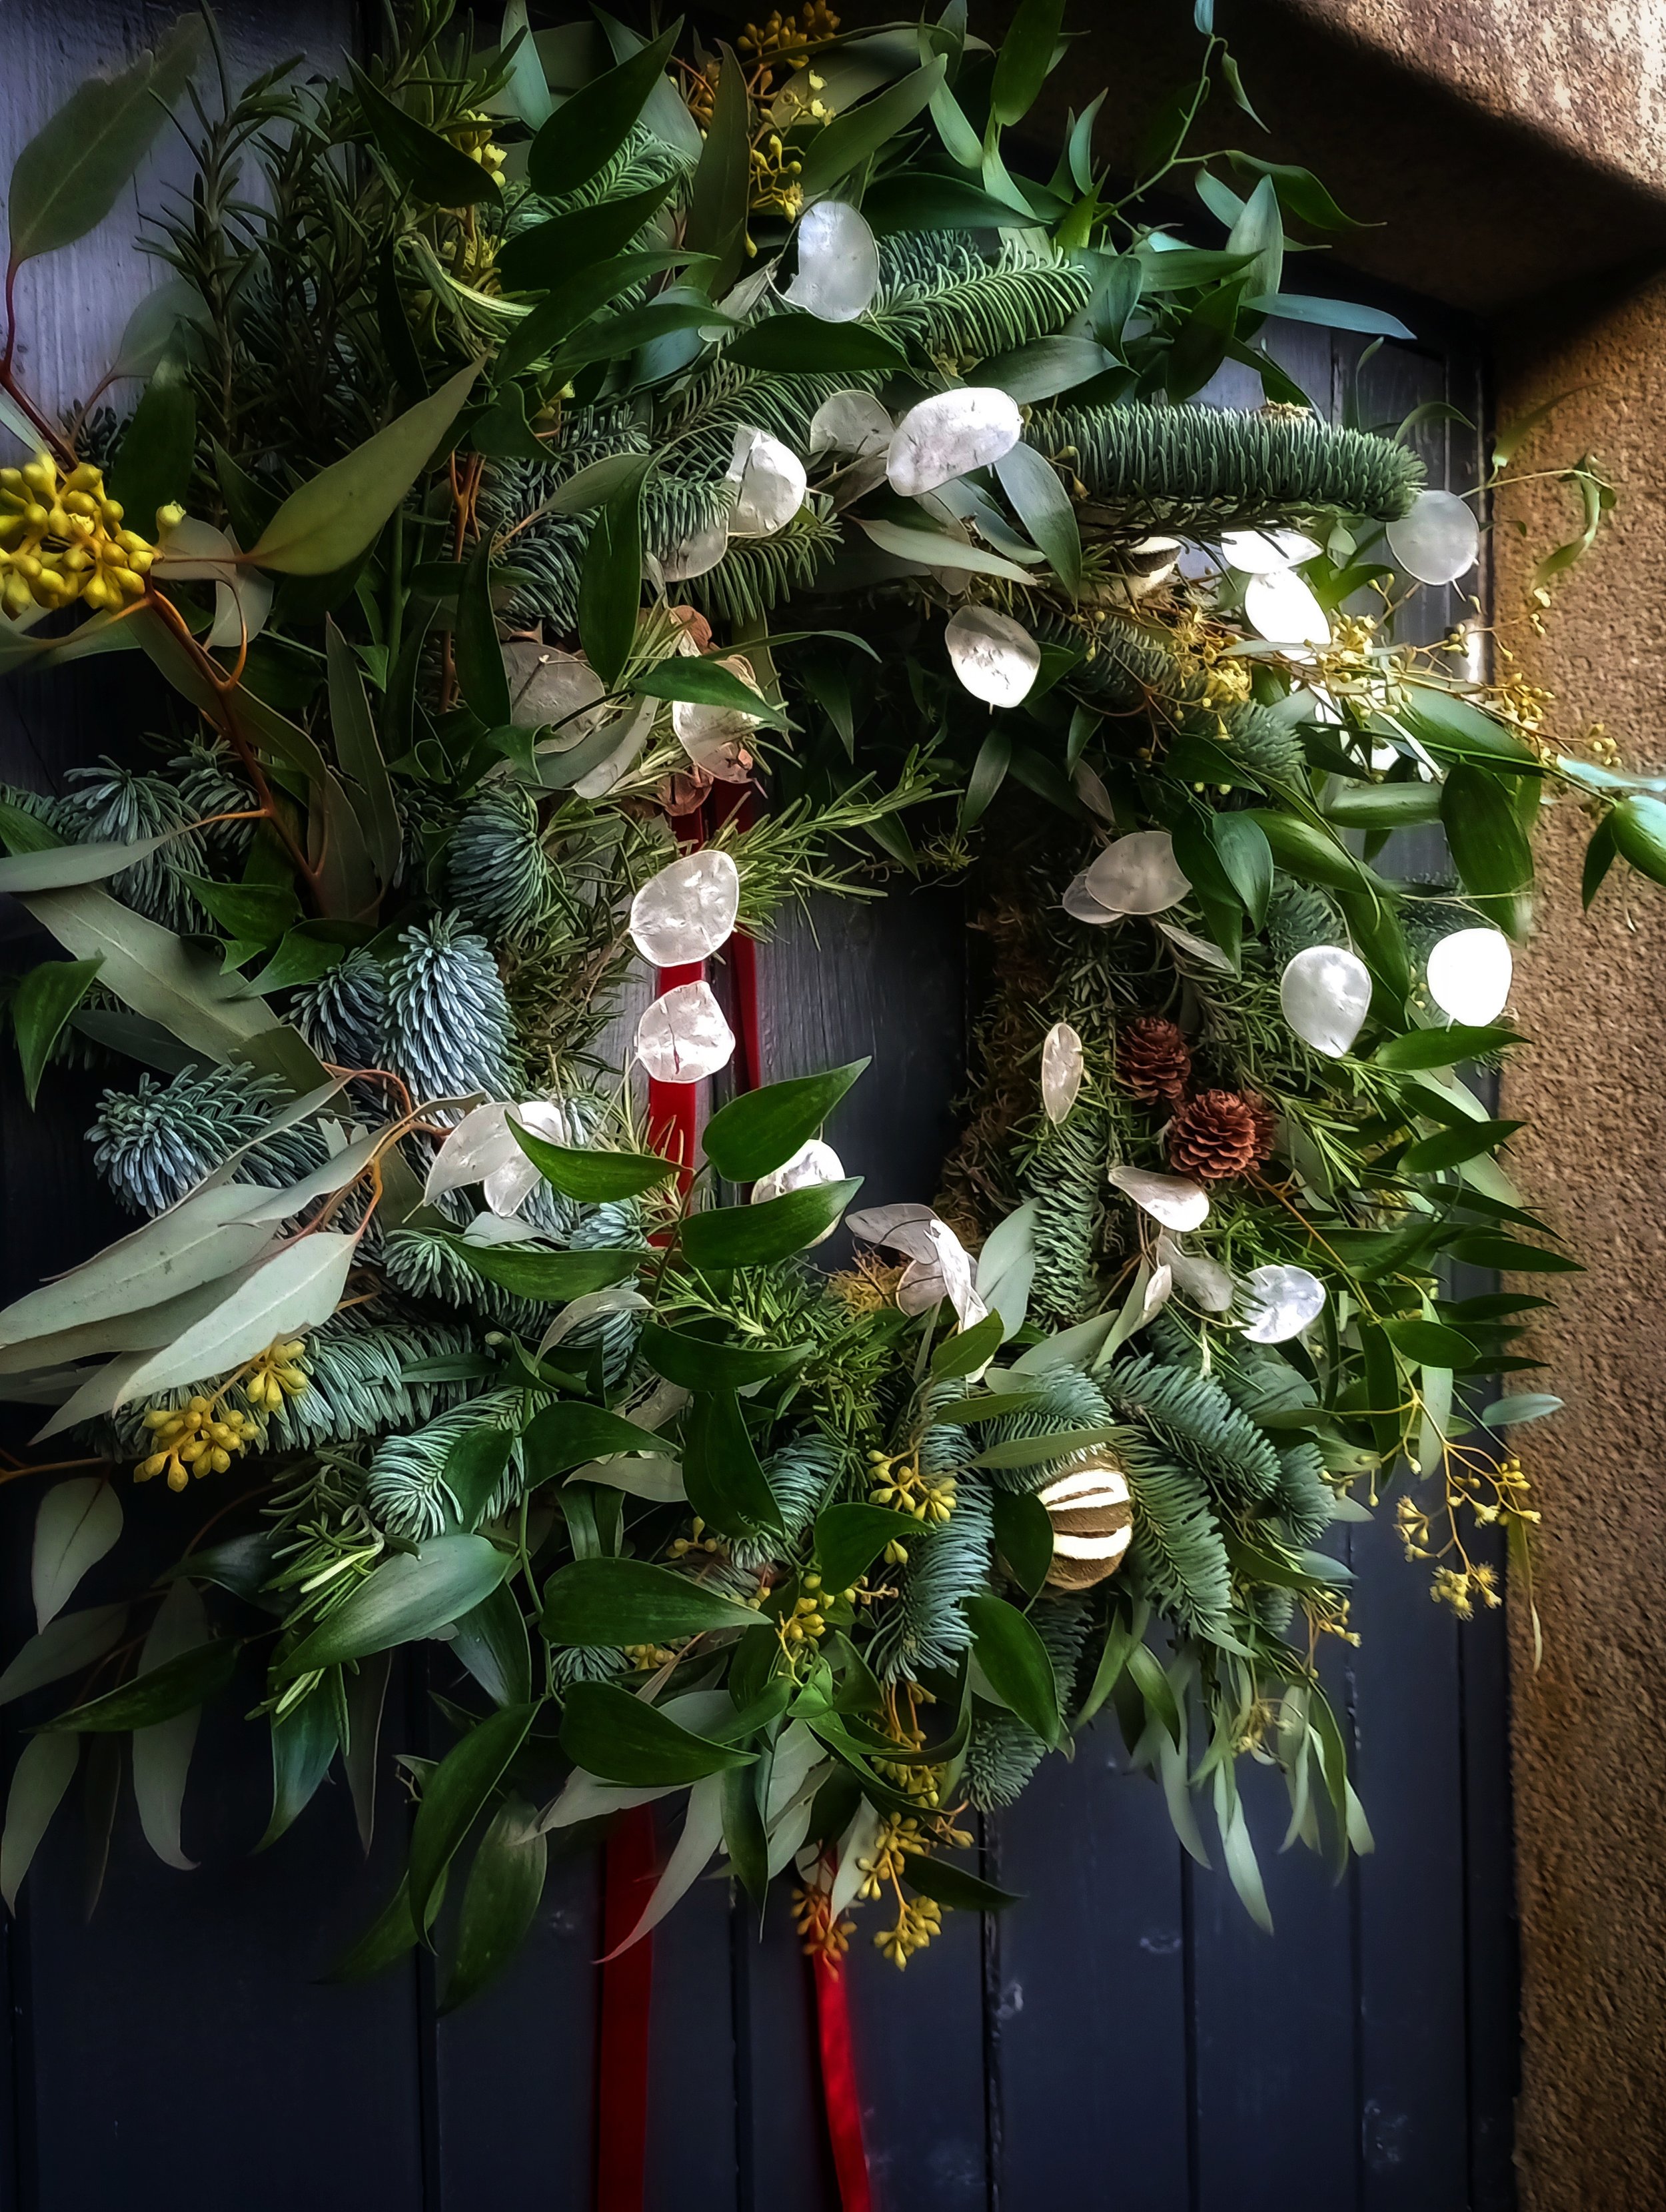
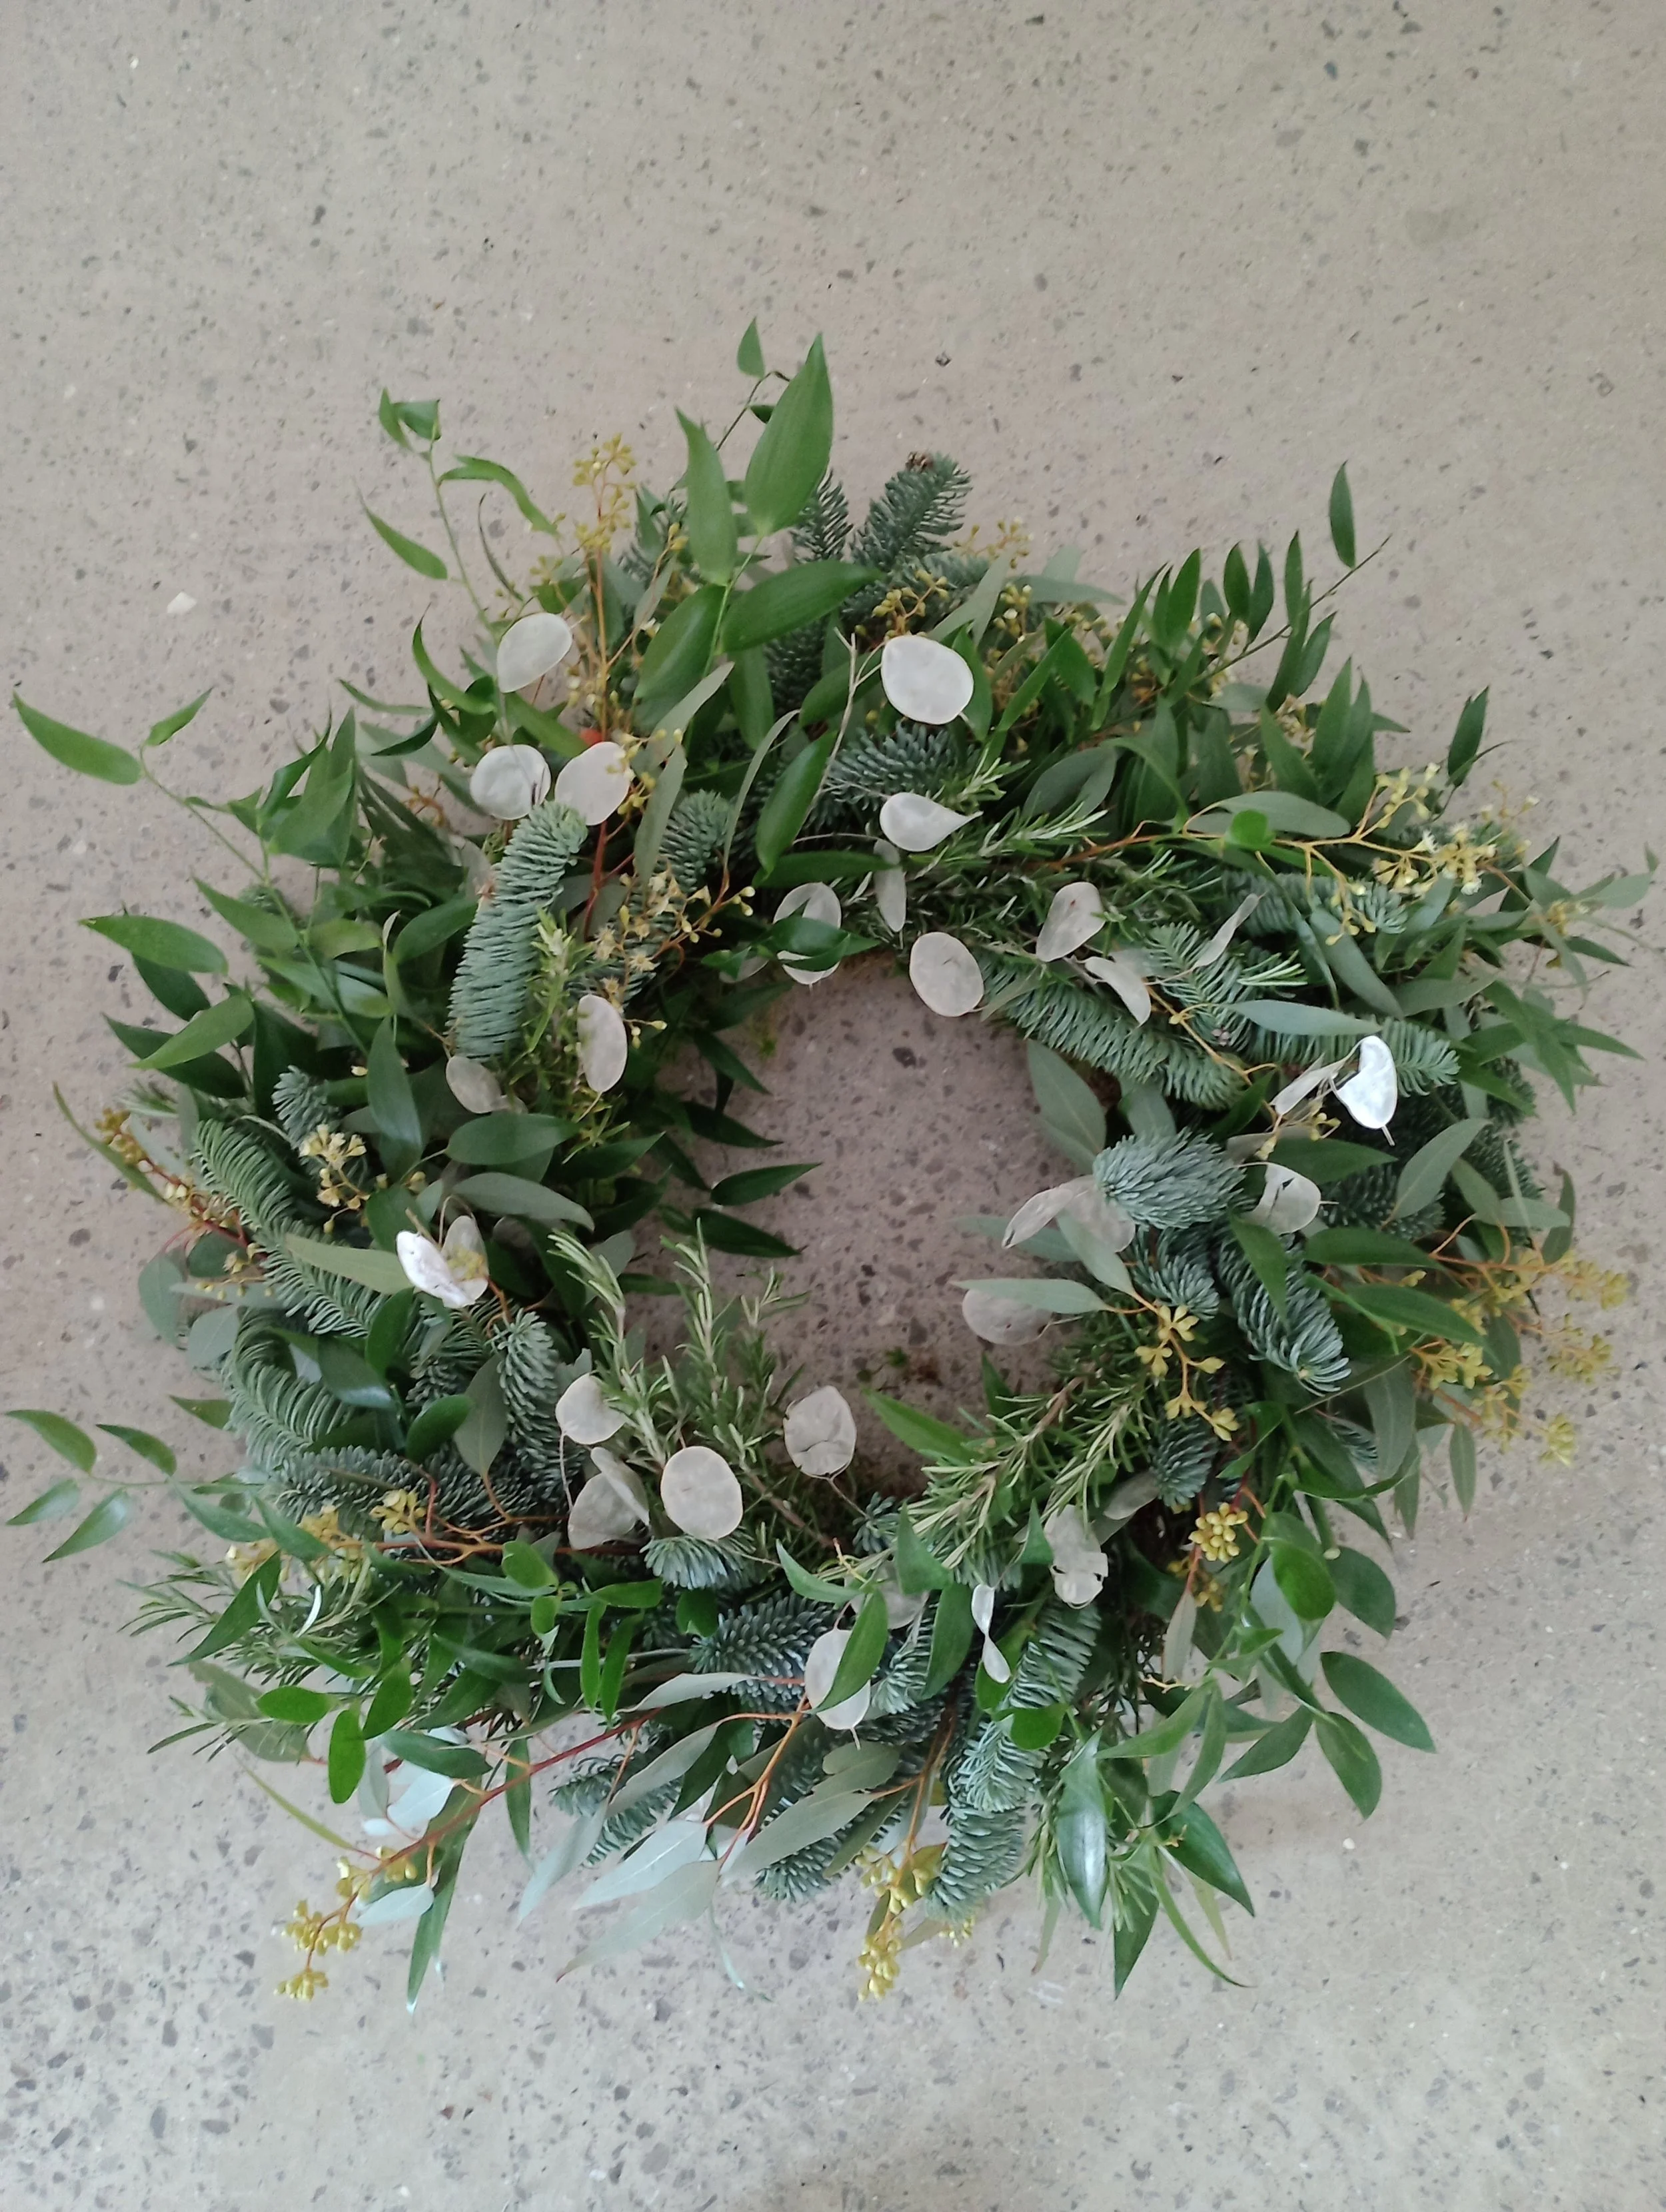
Sustainable Christmas Wreath: A Green Celebration
'Tis the season to be jolly and environmentally conscious! This year, consider adorning your home with a sustainable Christmas wreath that not only spreads festive cheer, but also contributes to a greener planet. I will walk you through the steps of creating a beautiful sustainable wreath using a moss wreath base, spruce, berried eucalyptus, rosemary, ruscus, honesty seed pods, dried limes, pinecones, and ribbon.
'Tis the season to be jolly and environmentally conscious! This year, consider adorning your home with a sustainable Christmas wreath that not only spreads festive cheer, but also contributes to a greener planet. I will walk you through the steps of creating a beautiful sustainable wreath using a moss wreath base, spruce, berried eucalyptus, rosemary, ruscus, honesty seed pods, dried limes, pinecones, and ribbon.
You will need:
Willow wreath ring
Moss
Spruce
Berried Eucalyptus
Rosemary
Ruscus
Honesty Seed Pods
Dried limes
Pinecones/Dried limes
Floral wire/Twine
Ribbon
Step 1: Adding Moss
Add moss to your willow wreath ring. You can use floral wire or twine. If you use twine, the wreath will be compostable.

Step 2: Gather Your Foliage
Start by collecting small bundles of spruce, berried eucalyptus, rosemary, and ruscus. Arrange them in your preferred order, ensuring a nice blend of textures and colours.
Step 3: Assembling the Foliage Bundles
Take each bundle and secure it onto the moss wreath base, overlapping them to create a full appearance. Be creative with your arrangements, allowing the different shades and shapes to complement each other. A top tip is to place your wreath on the floor to ensure that you are happy with the shape.


Step 4: Adding Honesty Seed Pods
Once you have added the bundles of foliage all the way around, add the honesty. You can do this by cutting the stem at an angle and poking securely into the wreath.
Step 5: Adding Pinecones and Dried Limes
Enhance the natural charm of your wreath by attaching pinecones and dried limes. Use floral wire to secure them to small pieces of spruce, then strategically place these accents throughout the wreath.
Step 6: Incorporating Ribbon
Bring a touch of elegance to your wreath by adding ribbon. Whether you choose a classic red, or a shimmering gold, attach it to the wreath in a way that suits your style. You can let it drape down the back for a cascading effect or attach it to the front with a charming bow.

This wreath will dry beautifully. You can also re-use the moss wreath base, the pinecones and the dried limes.
Happy Christmas!

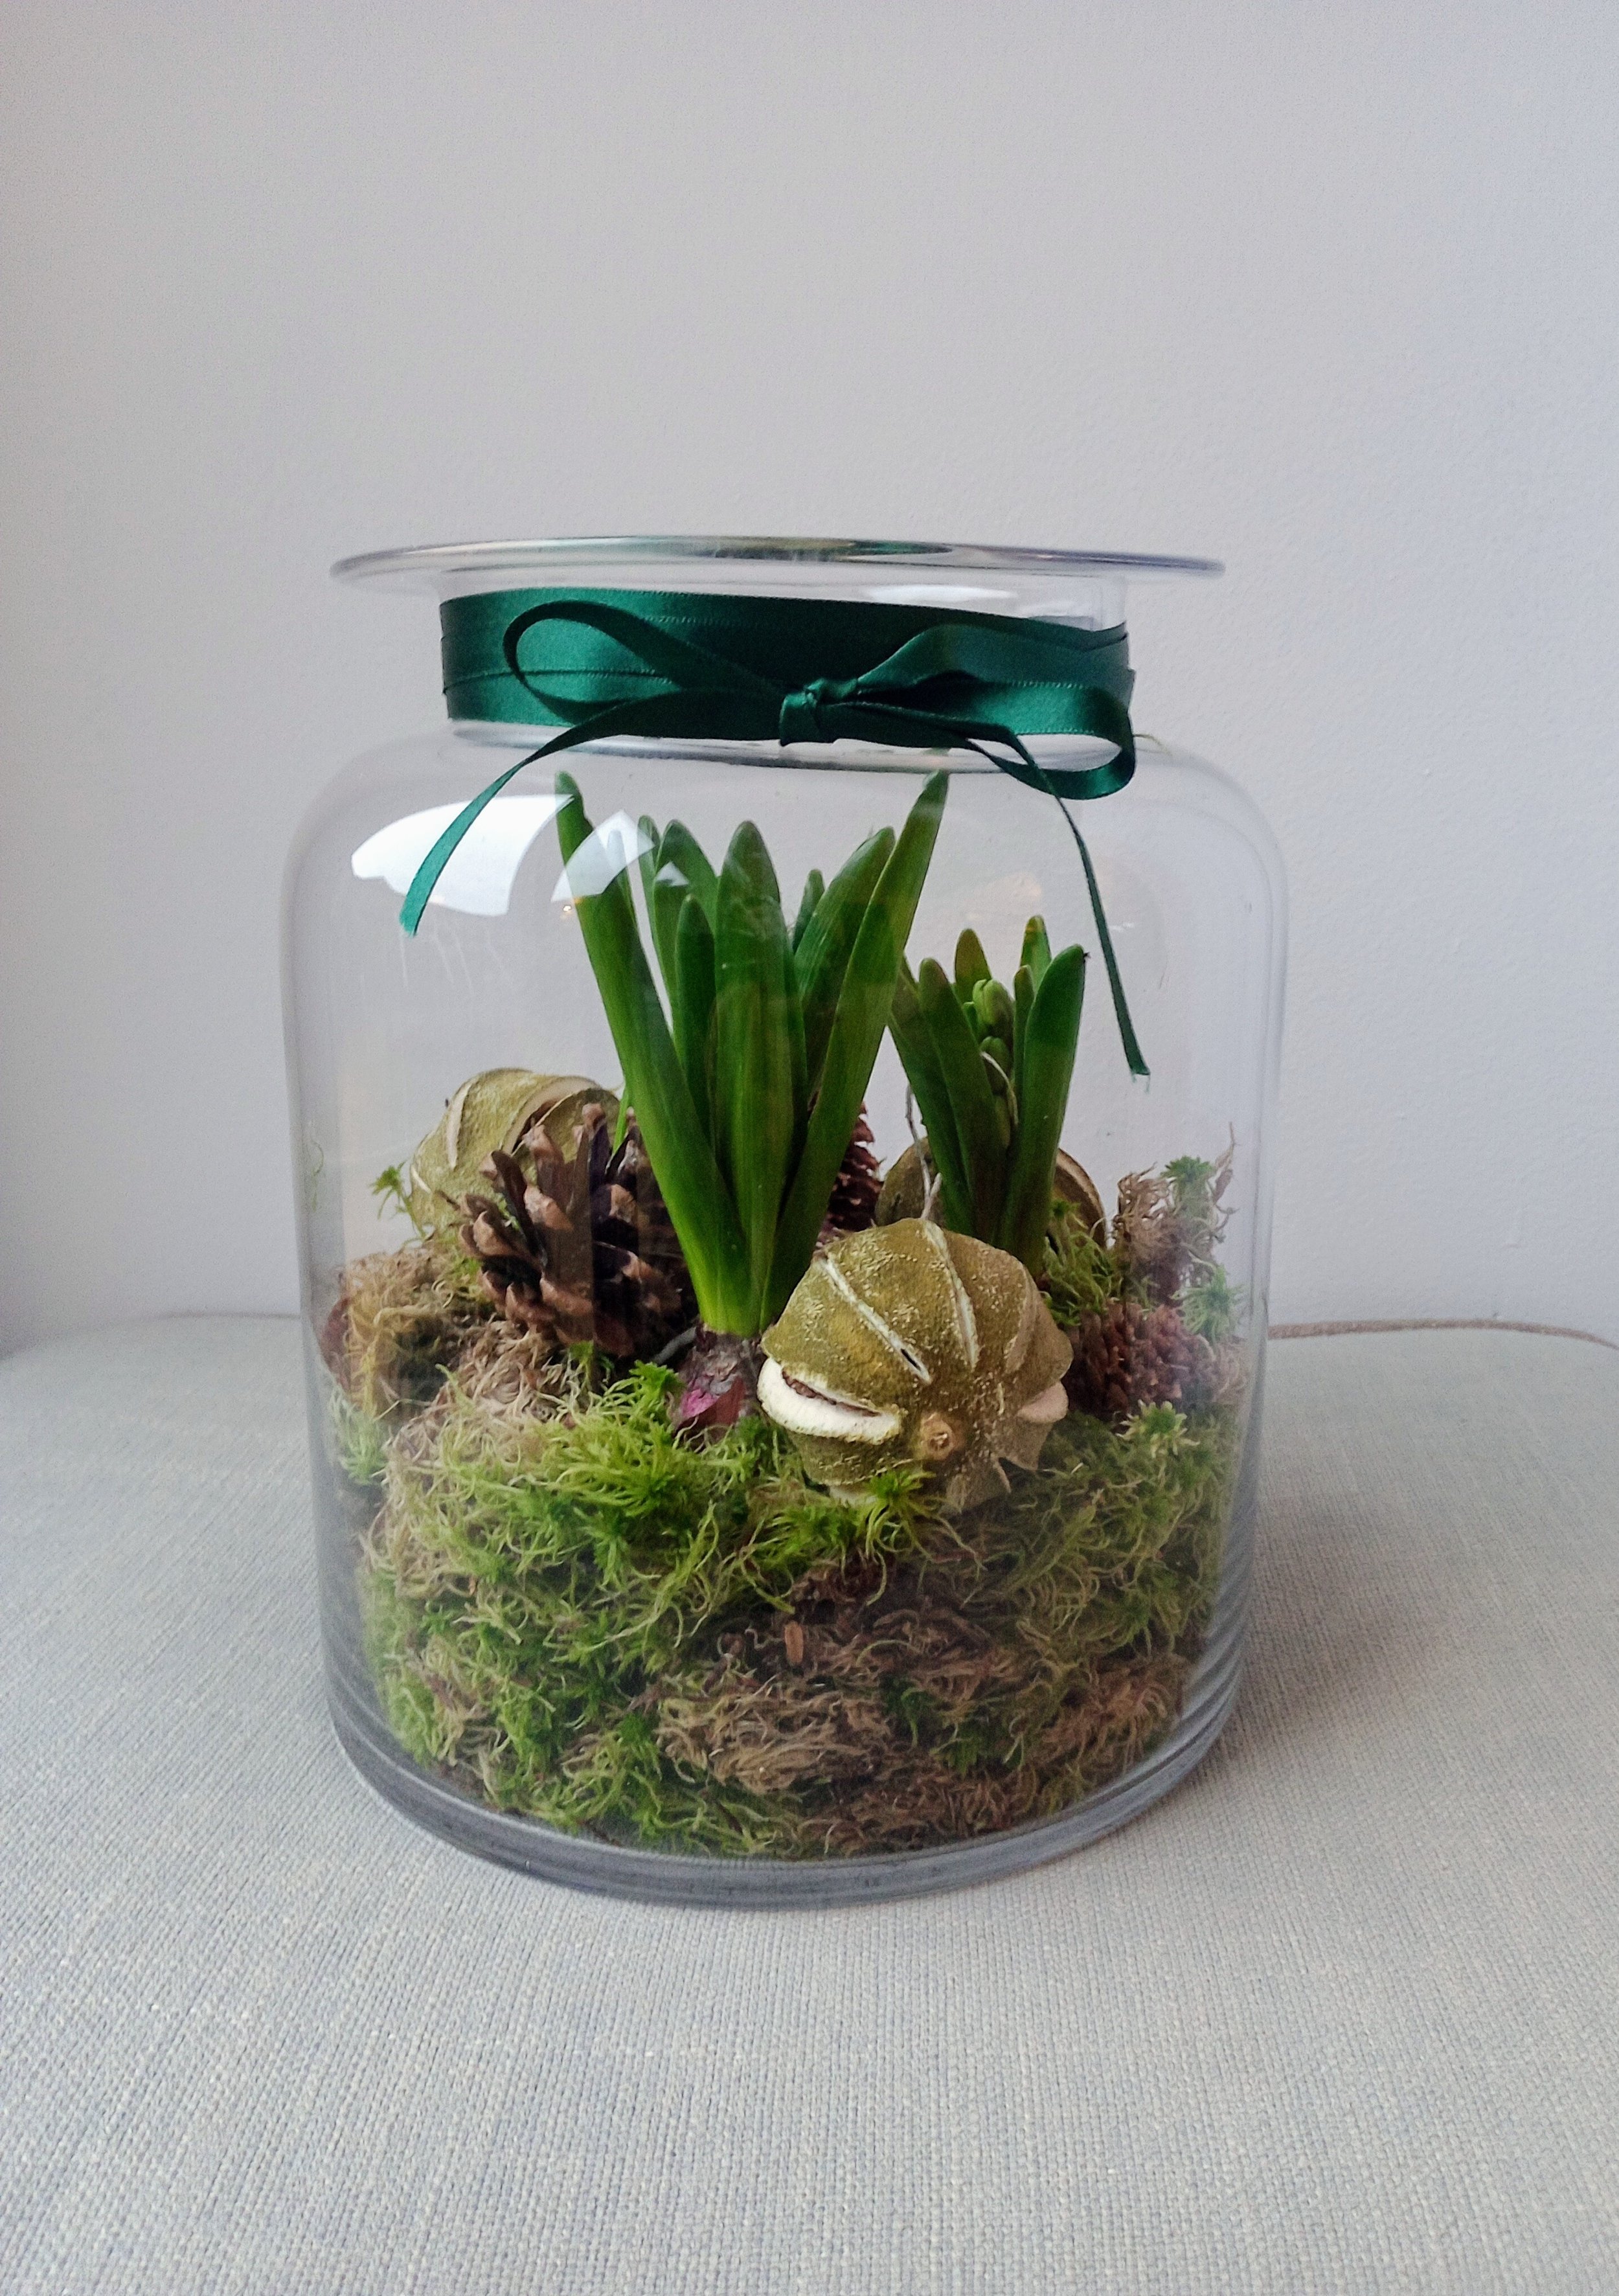
Creating a Stunning Winter Bulb Arrangement in an Apothecary Glass Jar
Winter brings with it the magic of holiday decorations, and what better way to embrace the season than creating a beautiful winter bulb arrangement? In this blog, I will guide you through the steps of creating a beautiful display using an apothecary vase, hyacinth bulbs, moss and a touch of elegance with a velvet ribbon.

Winter brings with it the magic of holiday decorations, and what better way to embrace the season than creating a beautiful winter bulb arrangement? In this blog, I will guide you through the steps of creating a beautiful display using an apothecary vase, hyacinth bulbs, moss and a touch of elegance with a velvet ribbon.
You will need:
Apothecary vase
Hyacinth bulbs
Moss
Velvet ribbon
Scissors
Decorative elements (optional)
Step 1: Prepare the Bulbs
Begin by carefully removing the soil from the hyacinth bulbs. Gentry brush off the excess dirt, ensuring not to damage the root or the bulbs.

Sept 2: Layer the Glass Jar
Start by a adding layer of moss at the bottom of the jar. This not only provides a natural and rustic base but also helps in moisture retention of the bulbs.
Step 3: Position the Bulbs
Carefully place the hyacinth bulbs on top of the moss. Consider the size and colour of the bulbs to create a balanced and visually appealing arrangement. Play with varying heights to add depth.
Step 4: Add Moss Between the Bulbs
Fill the gaps between the bulbs with additional moss. This step not only enhances the aesthetic but also aids in maintaining moisture levels around the bulbs.
Step 5: Tie with a Velvet Ribbon
Bring a touch of sophistication by tying a velvet ribbon around the neck of the jar. Choose a colour to compliment the colour of the bulbs and the moss. Secure the ribbon with a bow or a simple knot for an elegant finish.
Step 6: Optional Decorative Elements
Personalised your arrangement by adding decorative elements such as pinecones, dried limes and oranges, or even fairy lights!
Step 7: Display Your Creation
Find the perfect spot to showcase your winter bulb arrangement. It may be a centrepiece for your dining table, or an addition to your mantlepiece. Simply add a little water every few days. The bulbs will flower quite quickly, especially if they are in a warm room.

Creating a winter build arrangement brings some colour and beauty to your home at a time of year when there is nothing much to pick from the garden. The combination of hyacinth bulbs, paired with moss and a velvet ribbon, transforms a simple jar into a captivating winter display.


A Simple Autumn Garland
The shops are full of plastic autumn garlands at the moment. This is a more cost effective way to make a simple autumn garland for your home using autumn leaves from the garden.

The shops are full of plastic autumn garlands at the moment. This is a more cost effective way to make a simple autumn garland for your home using autumn leaves from the garden.
You will need:
Foraged autumn leaves.
Twine.
Candle wax / bees wax.
An old pot.

Step 1:
I used the remnants of some used candles. You can use bees wax for a more biodegradable option. If you are using old candles, place them in the freezer. Once frozen, the remaining wax comes out of the candle holders more easily.
Step 2:
Place the candle wax in an old pot and heat until the wax has melted.

Pour any remaining wax into some tin foil to use at another time.
Step 3:
Dip the leaves in the wax (be careful as the wax is hot) and then leave to dry.
Step 4:
Once the leaves are dry, tie them to the twine. You can also use small pegs to add the leaves to the twine. I didn’t have any, so I used small pieces of twine instead.

Step 5:
Hang in your place of choice and enjoy!
The preserved leaves will last for a good few weeks. This took around 30 minutes to make and cost nothing!


Botanical Pumpkins
A great project to do over the half-term holidays for Halloween. I made these in a few hours with my daughter. A different way to display your pumpkins!

A great project to do over the half-term holidays for Halloween. I made these in a few hours with my daughter. A different way to display your pumpkins!
You will need:
Pumpkins.
Mod Podge Glue.
A selection of dried flowers (you can use your own or you can buy them from a craft store).
Tweezers.
Small brushes.


A selection of dried flowers
Step 1:
Select some pumpkins. I used a large pumpkin and two smaller pumpkins.

Step 2:
Think about the positioning of the flowers. Brush some glue on the area of the pumpkin where you want the flower to go. Attach the flower with your tweezers. Press down gently. It is best to select flowers and leaves without thick stems as they stick more easily.

Step 3:
Add a fine layer of glue on top of the flower. This will secure the flowers in place and seal them.

Step 4:
Continue to add the pressed flowers until you are happy with the overall design.


A statement Orchid arrangement for your home/office
A simple statement flower arrangement does wonders to brighten up your home or office and can transform a space. Flowers can lighten our mood and make us smile (particularly on a dull and dreary day!). Flowers have the power to calm, boost your mood and help with overall well-being. Some flowers are fleeting and grace us with their presence for only a short period of time. However, Orchids can last for a long period of time if they are looked after well. Orchids also come in a variety of amazing colours.

A simple statement flower arrangement does wonders to brighten up your home or office and can transform a space. Flowers can lighten our mood and make us smile (particularly on a dull and dreary day!). Flowers have the power to calm, boost your mood and help with overall well-being. Some flowers are fleeting and grace us with their presence for only a short period of time. However, Orchids can last for a long period of time if they are looked after well. Orchids also come in a variety of amazing colours.
You will need:
A opaque vase/container
Three Orchids
Brown paper/scrap paper/paper bags
Sphagnum moss (I have used preserved moss)

Preserved sphagnum moss
Step 1:
Select your vase or container. I have chosen a back melamine vase.

Melamine Black Boat Shaped Vase

Step 2:
If you are using a large vase like I am, which is narrower and deeper at the bottom, fill the bottom with paper (or you can use biodegradable bubble wrap or recycled packaging). Fill in-between the pots with paper. This ensures the orchid pots are tightly packed into the vase. They shouldn’t move around! Add the three Orchids in their containers. Ensure they are level and think about the placement of the Orchids for the best design and shape. I used pink Orchids so that the colour popped against the black vase.


A combination of brown Kraft paper, paper bags and scrap paper
Step 3:
Cover the top of the vase with moss to cover the Orchid containers and any paper that is showing. The moss is there for decorative purposes only.

Very simple to make and less expensive than the arrangements you can buy in the shops. I have seen some arrangements similar to this for well over a hundred pounds!

Step 4:
Looking after your Orchids:
Orchids need very little water. Add a couple of ice cubes to the surface of the bark once per week.
Do not put Orchids in direct sunlight. Ensure they are placed in a bright cool room.
Do not put any flowers or plants next to fruit bowls.
Cut off any dried roots sticking out from the bark.
After the Orchid has finished blooming, cut back the stem.
Orchids will likely need repotting every four or so years.


A DIY Water Feature
I love a water feature, I find the sound of the water so calming, but I can never find any I like in the shops, so I thought I would make one!

I love a water feature, I find the sound of the water so calming, but I can never find any I like in the shops, so I thought I would make one!
You will need:
Bedding plants (I used 8)
Compost
Two pots - one wider than the other
Stones or gravel
A solar fountain (I order one online for £10)
Step 1:
Add stones or gravel to the wider pot.
Step 2:
Add the bedding plants around the edge of the wider pot (add some additional compost).
Step 3:
Place your smaller pot on top of the stones in your wider pot (be careful not to squash the flowers).
Step 4:
Add decorative stones to the smaller pot. Place the smaller pot on top of the wider pot. Add water to the smaller pot.
Step 5:
Finally, add the solar fountain and enjoy!
Total cost to make = £48.
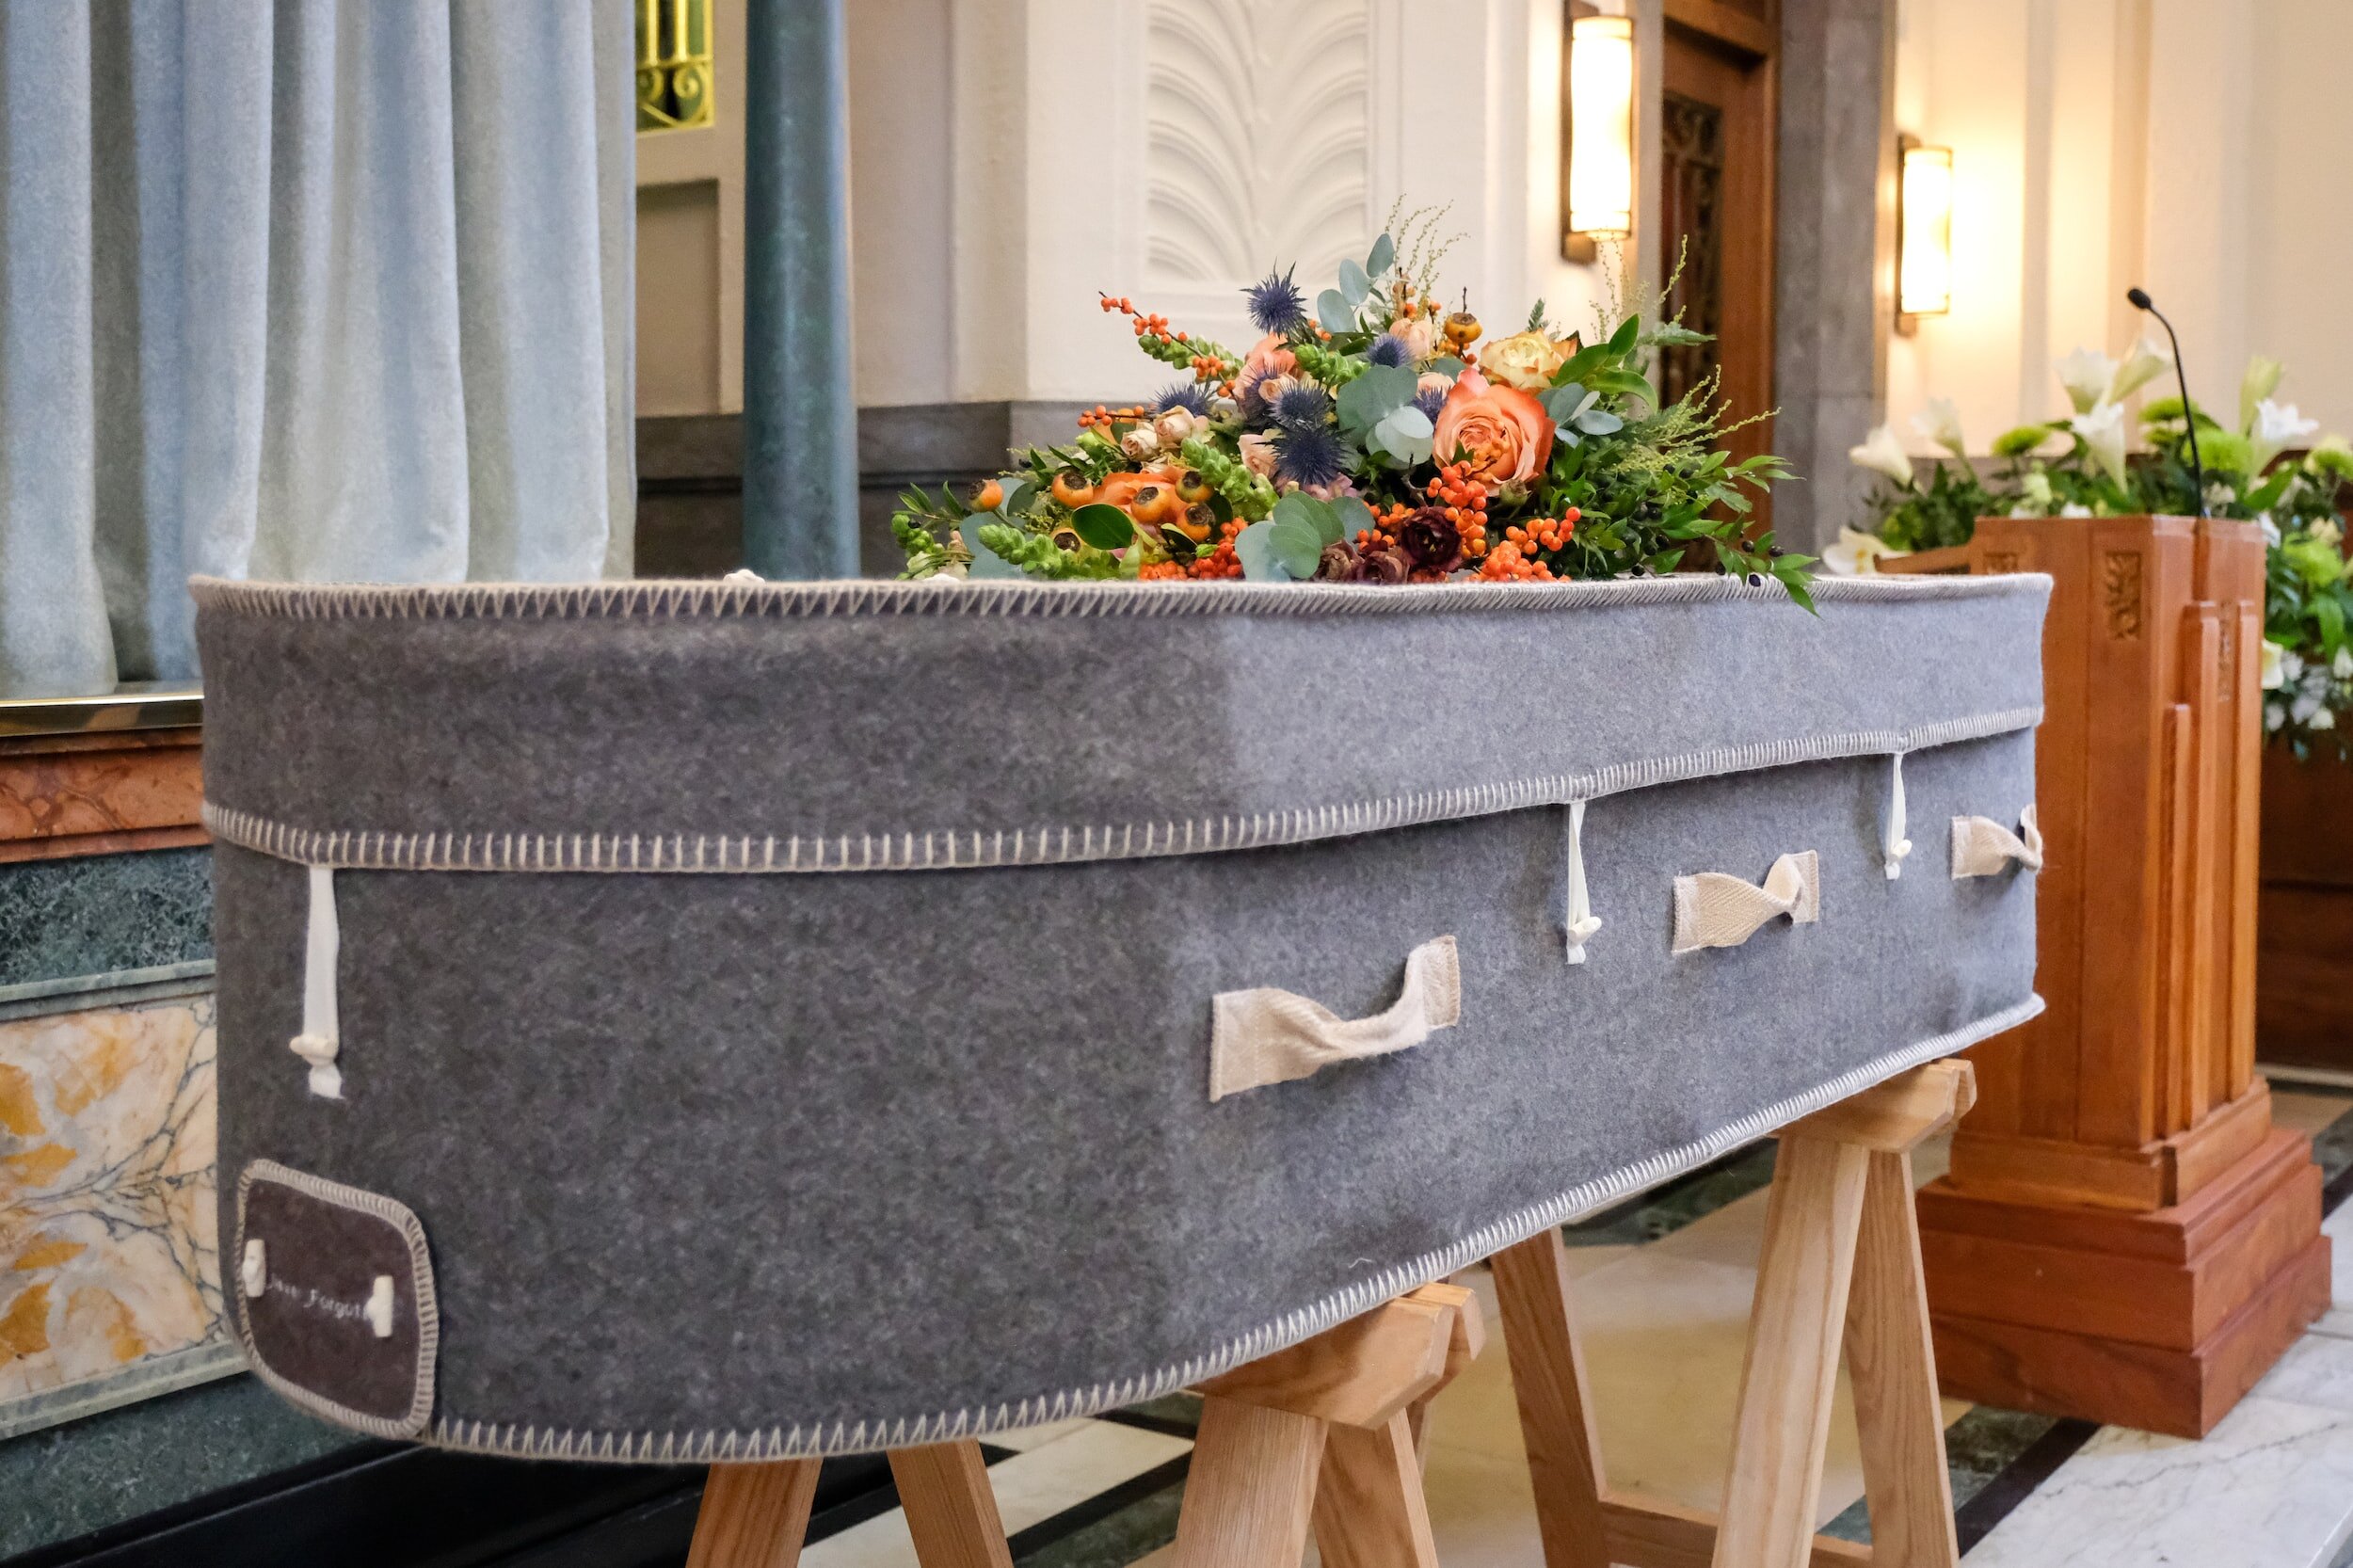
Sustainable Sympathy Flowers
My last journal focused on why I do not use plastic floral foam in any of my designs. This includes sympathy flowers. I have met some florists who have stated that sympathy arrangements cannot be made without using floral foam. This is simply not the case. Churchyards and cemeteries are often full of the remnants of plastic floral foam in plastic trays. I often see bins full of floral foam when I visit my dad’s grave. There is no need to use floral foam. Instead arrangements can be made so that they biodegrade without being harmful to the environment.

This is a stock image - I do not share images online of sympathy arrangements as they are so personal to the family.
My last journal focused on why I do not use plastic floral foam in any of my designs. This includes sympathy flowers. I have met some florists who have stated that sympathy arrangements cannot be made without using floral foam. This is simply not the case. Churchyards and cemeteries are often full of the remnants of plastic floral foam in plastic trays. I often see bins full of floral foam when I visit my dad’s grave. There is no need to use floral foam. Instead arrangements can be made so that they biodegrade without being harmful to the environment.
What are the options for sustainable sympathy arrangements?
Hand-tied floral sheaf:
Beautifully natural, this is the least expensive option for casket flowers. A hand-tied sheaf is a flat backed bouquet, tied with a biodegradable ribbon. This sits on top of the casket. This design produces the smallest carbon footprint, especially if local flowers are used.

Wreath:
I have written a few journal posts on making wreaths. I use the same methods for sympathy arrangements - a willow wreath base, moss, twine, foliage and flowers. Plants can also be incorporated into the design. A biodegradable arrangement available in a range of sizes.

Casket Arrangement:
Casket arrangements are the more expensive option as there are more flowers and foliage in these arrangements. They can be made in various sizes. Instead of using blocks of floral foam, I make the casket arrangement base with wood, hessian and moss. I cover the wood in the hessian and secure with twine. The moss is then added to the base with twine. The moss holds the flowers in place and keeps them moist. The whole arrangement is biodegradable. Using natural materials creates a more natural look. Floral foam can make the flowers appear very stiff in the arrangement.

Wood for the base (approx. 3ft long - with the flowers added the design will be slightly larger)

Hessian for the base

Twine to attach the moss to the base

Moss to hold the flowers and keep them hydrated

Completed base
I never send my funeral flowers via a delivery company. I always deliver them myself. This is a final tribute to a loved one and I want to ensure a personalised service.
Why Floral Edit does not use Floral Foam
Floral foam has been used in the floral industry for many years. Floral foam is used for wreath bases, bouquets, large installations and the remnants of floral foam can be found in many churchyards as it is frequently used to make sympathy arrangements.

Floral foam has been used in the floral industry for many years. Floral foam is used for wreath bases, bouquets, large installations and the remnants of floral foam can be found in many churchyards as it is frequently used to make sympathy arrangements.
Floral foam is a plastic material which holds the flower in place. It is not biodegradable and is a single-use plastic. I read recently that it can take 500 years for floral foam to deteriorate. When floral foam breaks down, it forms microplastics. These are then dispersed into the environment. This means that long after the flowers have died the floral foam continues to damage the planet.
When I was training to be a florist, floral foam was no place to be seen. Instead, sustainable methods were always demonstrated. Therefore, I learned floristry without the need for floral foam. I have never used it and never will. There are so many other ways that beautiful and natutal floral designs and installations can be created without the need for floral foam. For instance, I often use chicken wire and kenzans (pin frogs). Designs created without floral foam look more natural and much less stiff in my view. The flowers can also drink more easily.
All my sympathy arrangements are biodegradable. To create casket sprays, I use wood, hessian, moss and twine. For wreaths, I use willow wreath bases, moss and twine. There are so many floral design options without any need for floral foam.
With a bit of thought and imagination, I firmly believe that any floral design can be created without using floral foam.

A Foliage Spring Wreath
A wreath is not just for Christmas!
Wreaths are becoming more and more popular throughout the year. Making a foliage wreath is quite straight forward. Foliage wreaths often look just as beautiful when the foliage dries out.

A wreath is not just for Christmas!
Wreaths are becoming more and more popular throughout the year. Making a foliage wreath is quite straight forward. Foliage wreaths often look just as beautiful when the foliage dries out.
I never use floral foam to create wreaths or any other floral design. Floral foam is damaging to the environment. The technique I used to create this wreath is sustainable. The rattan wreath base can be re-used. Twine can be used instead of reel wire to make the design fully biodegradable. The moss can be re-used and the foliage can be put in the compost heap. Alternatively, when the foliage dries out the wreath can be kept as an everlasting wreath.
You will need:
Secateurs or garden scissors
A wreath ring
Reel wire or twine
Moss (I bought the moss from a local garden centre as foraging moss in the UK is not permitted)
Foliage

Ruscus

Pistache

Eucalyptus
Hawthorn

Niwaki Garden Scissors

Rattan Wreath
Step 1:
Add a loop of twine to the back of the rattan wreath base so that it can be hung from a door/wall. Attach the reel wire to the wreath. Make sure the reel wire is secure. The reel wire will stay attached to the wreath until all the foliage has been added.

Step 2:
Add the moss to the rattan wreath base by wrapping the reel wire a few times around the moss and pull tight (but not too tight or the reel wire will break!). If the moss is dry, simply place in a bucket of water. Squeeze the excess water from the moss before adding to the rattan wreath base. The moss will keep the foliage hydrated.

Step 3:
Once all the moss is added, attach the bundles of foliage. The bundles can be created before hand. I prefer to make the bundles as I go! Create the bundles into a fan shape. This ensures that the larger stems are on the outside of the wreath. The larger the foliage bundles, the larger the wreath!

Step 4:
Continue to add the bundles of foliage, placing each bundle slightly over the top of the other so that there are no gaps.

Step 5:
Keep checking that you are happy with the shape of your wreath. A good tip is to place the wreath on the floor to check the shape of the design. Continue to add the bundles until the entire wreath is covered.
Step 6:
Add the Hawthorn and other additional foliage stems to create some depth to the design. I added several additional stems of Eucalyptus once the wreath was complete. To do this, simply cut the stem at a 45-degree angle and poke into the moss. This technique can also be used to fill any gaps in the design.

Step 7:
Secure the reel wire by wrapping it around the back of the rattan wreath base a few times and tie. Mist the wreath and hang on a wall or door.
The wreath can also be placed on a table with the addition of a hurricane vase and candle. It is best to place the wreath on a large plate to ensure the wet moss does not damage the table.
Step 8:
To keep the wreath moist, mist every few days and check that the moss has not dried out. Once a week, place the wreath into a sink of water to rehydrate the moss.

A Living Wreath for Mothers’ Day
Flowers for Mothers’ Day are often imported. Violas are in-season in the UK in March and they are so pretty and delicate. This living wreath will last well outside on a table or an outside door/wall. When the moss starts to dry out, simply place the wreath in a bucket or sink of water. This living wreath should last for months. A beautiful handmade gift using in-season flowers.

Flowers for Mothers’ Day are often imported. Violas are in-season in the UK in March and they are so pretty and delicate. This living wreath will last well outside on a table or an outside door/wall. When the moss starts to dry out, simply place the wreath in a bucket or sink of water. This living wreath should last for months. A beautiful handmade gift using in-season flowers.
You will need:
12 violas
A 10 inch wreath ring
Reel wire
Mossing pins
Moss
A protective cover if you are making the wreath on a dining or kitchen table
Step 1:
Prepare the wreath base. I used a wire wreath base and simply added the reel wire around the base to provide some structure. Keep the reel wire attached to the wreath base.

Step 2:
Take the violas out of the tray and remove some of the soil. I moved inside at this stage as it was cold and windy outside. If you are making this inside, use a protective cover on your table - it is very messy!

Step 3:
Place the voilas around the wreath base so that you can check how many you will need. I used 12.

In this image you can see that some of the soil has been removed from the violas
Step 4:
Attach the violas to the wreath base with the reel wire. Make sure you wrap the reel wire around the violas a few times and pull tight to secure. Add the violas at different angles so that the finished wreath looks more natural - as the violas would grow in nature. Cut the reel wire and secure around the back of the wreath ring (make sure it is very secure as you don’t want your violas falling out when the wreath is hanging from the door!).

Step 5:
Hide all the soil with moss. Attach the moss with mossing pins. Make sure the moss is attached well - you might need to use quite a lot of mossing pins!

Mossing pins
Step 6:
Hang the finished wreath from an outside door or wall. If you are using the wreath as part of a table display, place the wreath on a plate so that it doesn’t damage the table.
Once the wreath is past its best you can re-use the wreath ring, moss and mossing pins.

Happy Mothers’ Day!